MB2 in Maxillary Molars - does it really exist?
23/06/2017
Marino Sutedjo
Warning: Undefined variable $post in /var/www/vhosts/styleitaliano-endodontics.org/endodontics.styleitaliano.org/wp-content/plugins/oxygen/component-framework/components/classes/code-block.class.php(133) : eval()'d code on line 2
Warning: Attempt to read property "ID" on null in /var/www/vhosts/styleitaliano-endodontics.org/endodontics.styleitaliano.org/wp-content/plugins/oxygen/component-framework/components/classes/code-block.class.php(133) : eval()'d code on line 2
The main objective of root canal treatment is thorough shaping and cleaning of all pulp spaces and their complete filling with an inert filling material. A major cause for post-RCT disease is the inability to locate, debride or fill properly all canals of the root canal system. Therefore a better knowledge of the root canal system and its frequent variations is necessary for a successful root canal treatment.
The maxillary first molar is known to be tooth that has been researched more than any other tooth in the mouth and it is generally accepted that maxillary first molars have 3 roots and 3 canals (MB, DB, P). But most studies reported incidences of a second canal (MB2) in the mesiobuccal (MB) root in over 50% of the cases and this raise a question whether this MB2 canal is really exists.
We should also be aware that the most common cause of endodontic failure of the maxillary first molar is missing this MB2 canal. Therefore, in this article I will discuss about how to find MB2 canal in maxillary first molar so that we can have an answer whether maxillary first molar have 3 roots and 4 canals (MB1, MB2, DB, P) or just 3 canals.
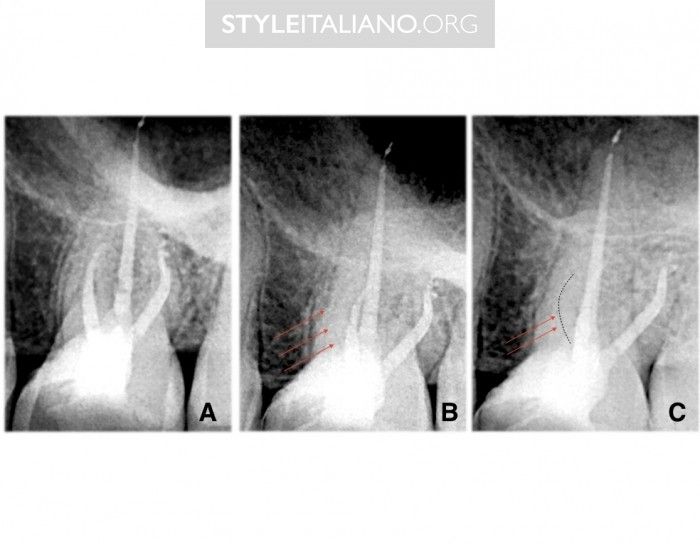
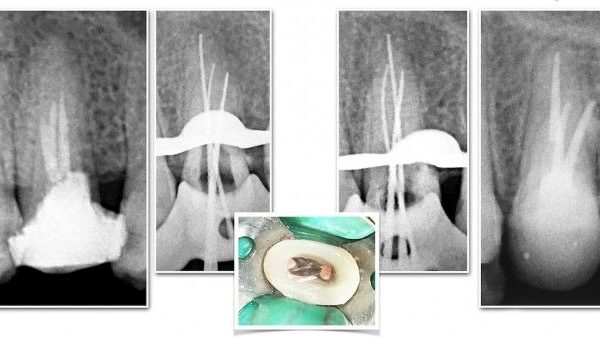
Fig. 1
We can see in image A, everything looks normal, but when we take different angled radiographs (B) we can see imediately that there is a missed MB2 (C).
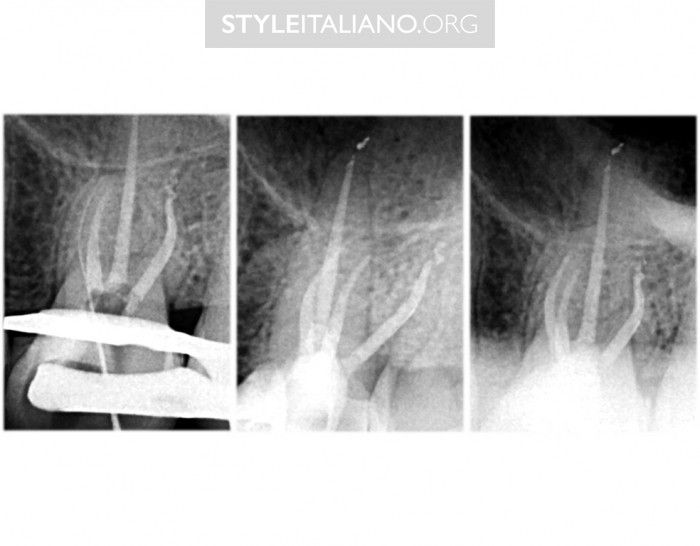
Fig. 2
4. Access Cavity
Well, access cavity as a first step in all endodontic procedure is always crucial. I have seen many clinical cases of missed canals and failing to identify extra canals in which the main cause is having an under prepared access cavity. I am not going to discuss the details of access cavity in this article, but having a complete access emphasizing on internal flaring, flattening and finishing the axial walls is necessary to help us to better inspect the anatomy. I am not saying that we must have big access, but an adequate access still can be achieved without sacrificing unnecessary tooth structure.
Removing all previous restorations such as crowns is sometimes necessary to achieve good access. This can give us better orientation to the tooth and can save us from perforation while looking for a canal.
FINDING THE MB2
Well, after now we know the important factors in finding MB2 let’s talk about strategy and technique. As we know, not all of MB2 can be identified easily. They will not just stay there and we just stick our files and find it. Mostly, we have to work hard to search for it, explore it, enlarge it to identify it. In this article I will also discuss about some tips and trick that can be used to help us finding MB2.
A. WHITE LINE TEST
In necrotic teeth, when we create our access using either a bur or ultrasonic technology, it will produce a product which is dust that can go into anatomical spaces such as grooves. This will create an image of a “white line”. We should get suspicious of this kind of line as it can be used to help us find another orifice.
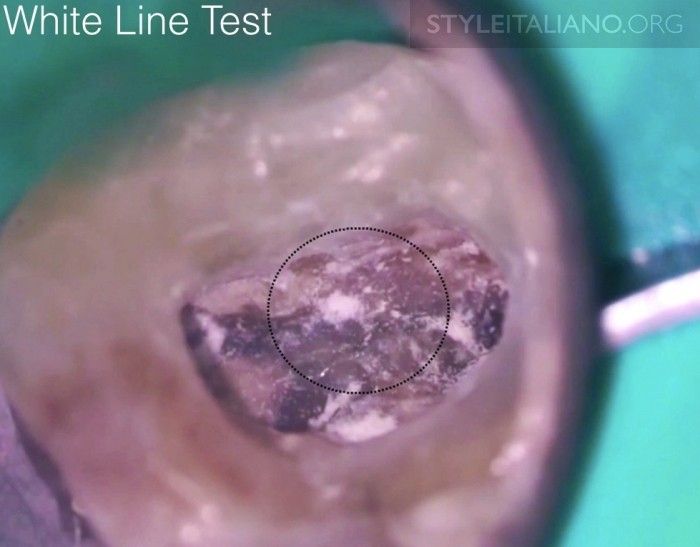
Fig. 3
B. RED LINE TEST
As well as in necrotic teeth, in vital teeth we have “red line” test. For sure in vital teeth after we create our access cavity and penetrate the pulp chamber, it will bleed. Once after we get control of the hemorrhage and begin to extirpate the tissue, sometimes we might see a little bead of blood emanating out of a groove. This can be another indicator that there are more canals to be found.
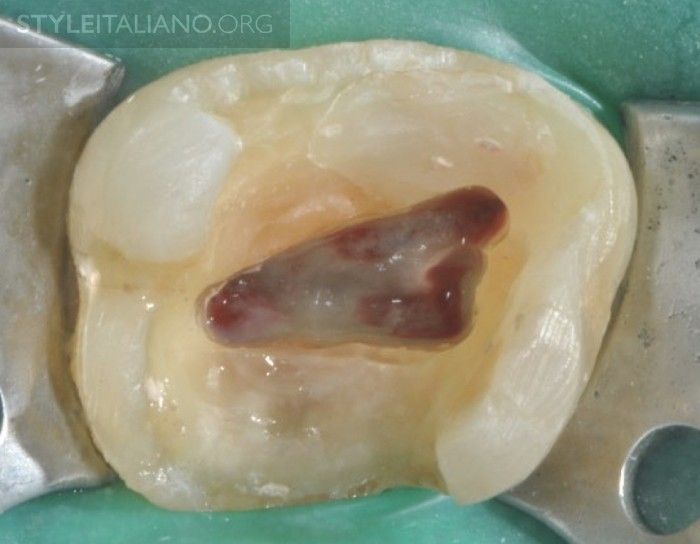
Fig. 4
Red test, image courtesy of Dr. Calogero Bugea
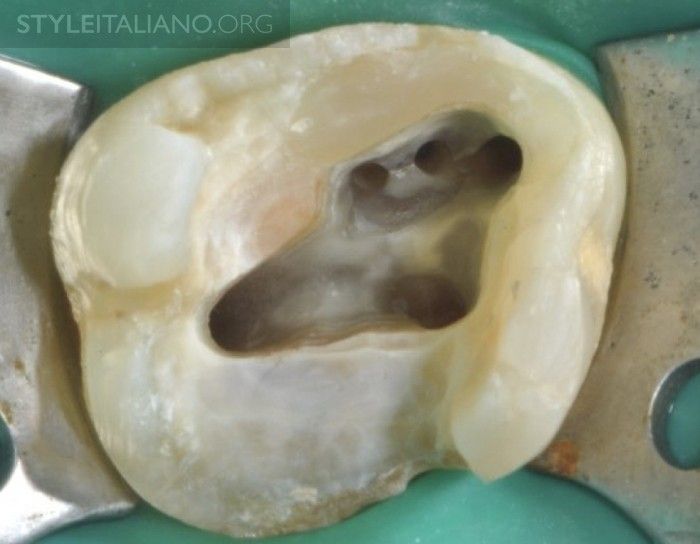
Fig. 5
Image courtesy of Dr. Calogero Bugea
C. BUBBLE TEST
Bubble test has been mentioned many times since the era of microscope driven endodontic. In this test we can use a sodium hypochlorite solution into the pulp chamber and this will disassociate into sodium and chloride ions that will release free oxygen when it contacts with organic tissue. This will appear as a bubble on the chamber floor and we will able to see it through the microscope and this is another clue to help us investigate the anatomy.

Fig. 6
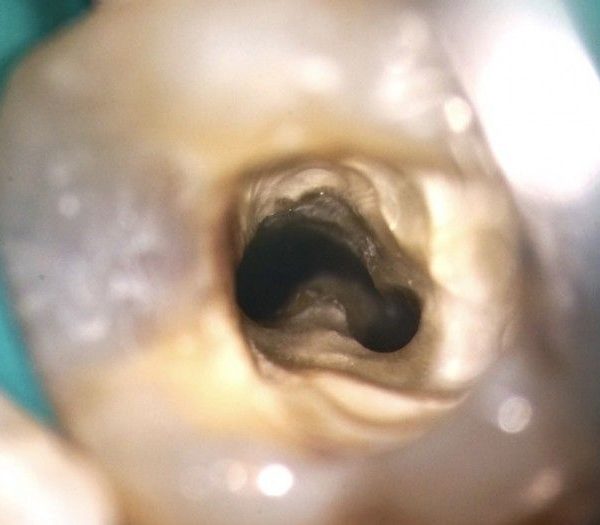
D. COLOR TEST
Color test is also important to remember. One of the three laws of pulp chamber anatomy that were published in Journal of endodontic by Krasner et al. 2004 is the law of color change. The developmental root fusion lines or root map are narrow lines on the pulpal floor of furcated teeth and provide a visual trail that has a darker color than the chamber floor. This will lead us to other canal orifices.
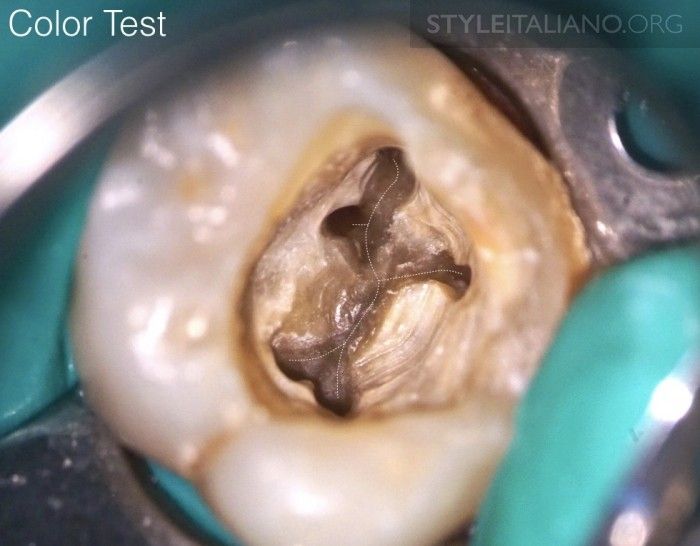
Fig. 7
We can see that the floor of the pulp chamber is always a darker color than the surrounding dentinal walls and the developmental root fusion lines (root map) are darker than the floor color.
Fig. 8
E. DYE TEST
Dyes are useful. Methylene blue in this case can be used. Drop a few drops of dyes into the pulp chamber and then rinse the pulp chamber with water. The dye will go into fissures and grooves that help us to roadmap the internal anatomy.
F. EXPLORING
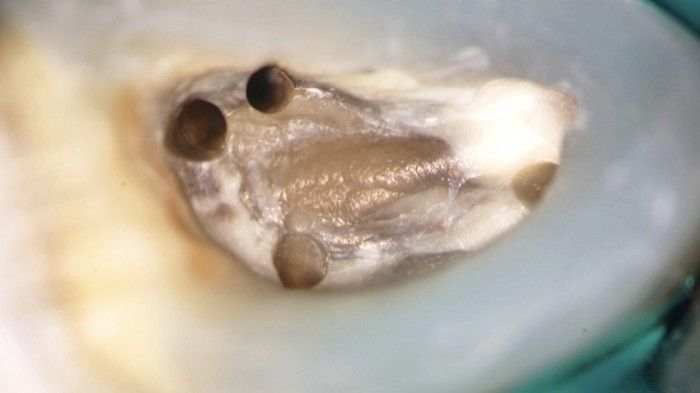
After completion of the access cavity, we can use several tests above to help us find the location of MB2 canal. In some cases, with the help of magnification, the MB2 canal orifice can be located directly after we do some of the tests. But for sure this will not occur in all cases. There are also two important stages to find MB2 canals. The first one is to find all the main canals of the first maxillary molar. In this case it will be Mesiobuccal canal (MB1), Distobuccal canal (DB) and Palatal canal (P). For these three canal orifices, we have to remember the anatomical key for easier identification.
- Mesiobuccal (MB1): Located slightly distal to MB cusp tip
- Distobuccal (DB): Located distal and slightly palatal to MB1 canal. It tends to be in line with buccal grove
- Palatal (P): Located distal to Mesio Palatal (MP) cusp tip
The second stage now is to identify the location of the MB2 canal orifice. The MB2 canal usually located palatal to MB1 canal and slightly mesial to a line drawn between MB1 and Palatal canal
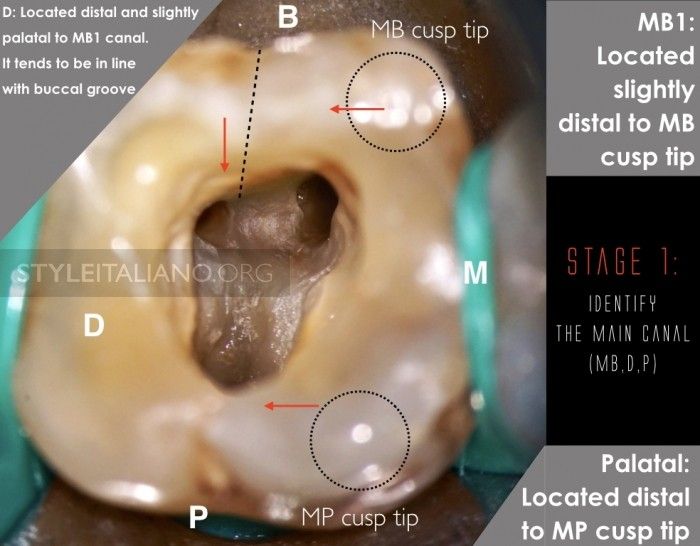
Fig. 9
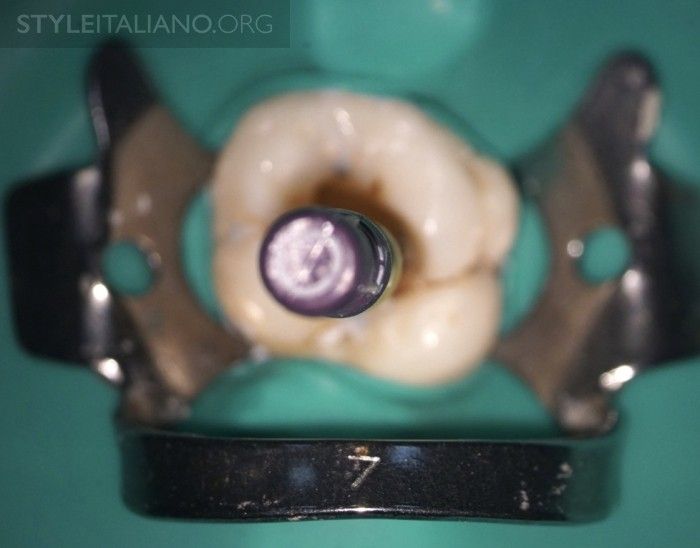
Fig. 10
In most teeth, even after the MB2 canal orifice is located, we still cannot negotiate the canal easily, unless some dentin was removed from the orifice level apically. For this purpose we can use long shank, low speed burs such as Munce discovery burs. These burs are very useful because they remove the bulky head of the handpiece, and they get it out of the way so we have a preferable line of vision along the shaft of the bur. We can watch the bur turn and we are not looking at the back of our handpiece instead we are looking at the bur turn.
Ultrasonic tips also can be used very well if we want to have a good vision without any obstacles from the bulky head of a handpiece. Simply use piezoelectric ultrasonics with appropriate tips such as Start-X # 3 and it will give us better vision through a sleek, contra-angled instrument where we can watch the tip work.
A rotary instrument that has a very good cutting ability is also one of my favorites to search for an opening for root canal negotiation. Use the rotary instruments such as ProTaper SX, WaveOne Gold or Reciproc blue in a brushing motion away from the furcation to remove the triangular dentin at the orifice level and reduce the coronal interference.
The Endo explorer is not talked about much in exploring the MB2 canal orifice, but basically this explorer is quite important. Since it’s very nice to dig out little roof of overlying dentin, and sometimes this is much safer than trying to use a bur to drill it. When using the explorer, it’s advisable to push firmly the overlying dentin with the tip. The tip of endo explorer itself is pretty durable.
After removing some dentin, for sure we hope to see a small opening to the MB2 canal and we are ready to explore and negotiate those canals. In negotiation there are no differences from any other root canal negotiation. Use a mechanical glide path instrument, small hand file or a micro opener.
For micro openers, basically it’s just a stainless steel file that's attached to a handle. This ergonomic handle will get your fingers out of sight and the file's handle away so we can have direct vision.

Fig. 11
Sometimes with K-file our vision gets blocked by the handle of the file
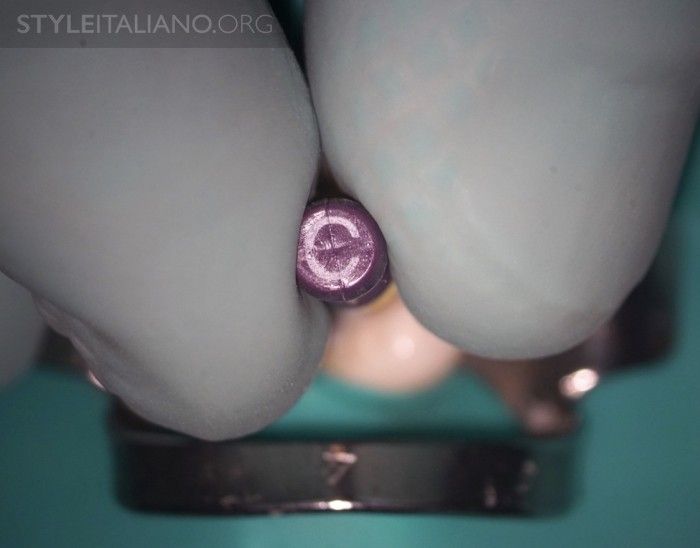
Fig. 12
Our finger can also block our sight when we do our root canal negotiation
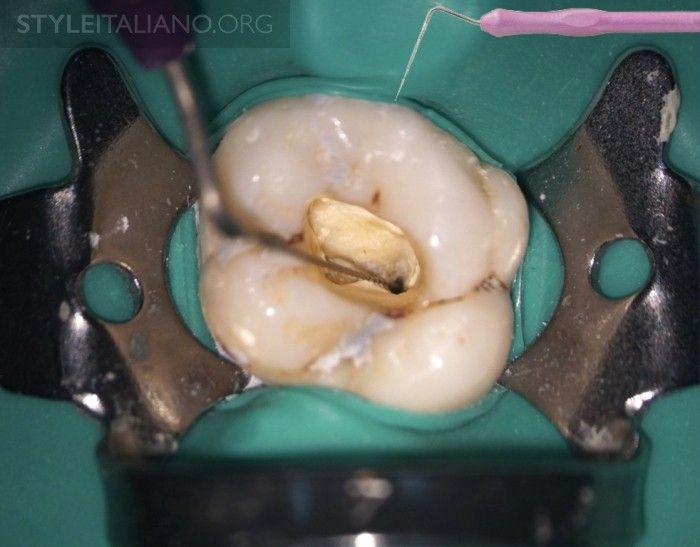
Fig. 13
Using micro openers can enhance our vision
Conclusions
Mesiobuccal roots of maxillary first molar teeth had more variation in their canal system than the distobuccal or palatal roots. Many studies reported a high incidence of MB2 root canals in maxillary molars. A good triangular access cavity, careful examination of the pulpal floor is important to enhance detection and mapping of the mesiobuccal root canal system with the potential to identified the MB2 canal and improve the quality of root canal treatment.
Bibliography
Weine FS, Healey HJ, Gerstein H, et al. Canal configuration in the mesiobuccal root of the maxillary first molar and its endodontic significance. Oral Surg Oral Med Oral Pathol 1969; 28: 419425.
Alavi AM, Opasanon A, Ng YL, et al. Root and canal morphology of Thai maxillary molars. Int Endod J 2002; 35: 478485.
Ruddle C.J, How to Find the MB2. Advanced Endodontic, 2013
Zhang R, Yang H, Yu X, et al. Use of CBCT to identify the morphology of maxillary permanent molar teeth in a Chinese subpopulation. Int Endod J 2011; 44: 162169.
Zheng QH, Wang Y, Zhou XD, et al. A cone-beam computed tomography study of maxillary first permanent molar root and canal morphology in a Chinese population. J Endod 2010; 36: 14801484.
Neelakantan P, Subbarao C, Ahuja R, et al. Cone-beam computed tomography study of root and canal morphology of maxillary first and second molars in an Indian population. J Endod 2010; 36: 16221627.
Lee JH, Kim KD, Lee JK, et al. Mesiobuccal root canal anatomy of Korean maxillary first and second molars by cone-beam computed tomography. Oral Surg Oral Med Oral Pathol Oral Radiol Endod 2011; 111: 785791.
Baratto Filho F, Zaitter S, Haragushiku GA, et al. Analysis of the internal anatomy of maxillary first molars by using different methods. J Endod 2009; 35: 337342.
Sert S, Bayirli GS. Evaluation of the root canal configurations of the mandibular and maxillary permanent teeth by gender in the Turkish population. J Endod 2004; 30: 391398.
Kottoor J, Velmurugan N, Sudha R, et al. Maxillary first molar with seven root canals diagnosed with cone-beam computed tomography scanning: a case report. J Endod 2010; 36: 915921.
Buhrley LJ, Barrows MJ, BeGole EA, Wenckus CS. Effect of Magnification on Locating The MB2 Canal in Maxillary Molars. J Endod 2002; 28: 324-327.
Stropko JJ. Canal Morphology of Maxillary Molars: Clinical Observations of Canal Configurations. J Endod 1999; 25: 446-450.
Ruddle CJ. How to Find the MB2. July 11th, 2013 (www.endoruddle.com)