Cavity refinement: an essentiality or extravagance?
18/11/2020
Ahmed Shawky
Warning: Undefined variable $post in /var/www/vhosts/styleitaliano-endodontics.org/endodontics.styleitaliano.org/wp-content/plugins/oxygen/component-framework/components/classes/code-block.class.php(133) : eval()'d code on line 2
Warning: Attempt to read property "ID" on null in /var/www/vhosts/styleitaliano-endodontics.org/endodontics.styleitaliano.org/wp-content/plugins/oxygen/component-framework/components/classes/code-block.class.php(133) : eval()'d code on line 2
Access cavity preparation is considered as the most important step in the endodontic treatment protocol. Inability of the operator to visualize anatomical requirements of the preparation may end in aggressive mishaps which complicate the treatment procedures or compromise the ultimate treatment outcomes.
Being the most important step in endodontic treatment course, access cavity preparations must be carefully planned by the operator to avoid aggressive consequences such as:
-missed canals
-compromised cleaning of the root canal system
-canal transportations
-instrument separation
- complicated treatment course up to failure of treatments.
Therefore, access is considered an access to success in endodontic treatments.
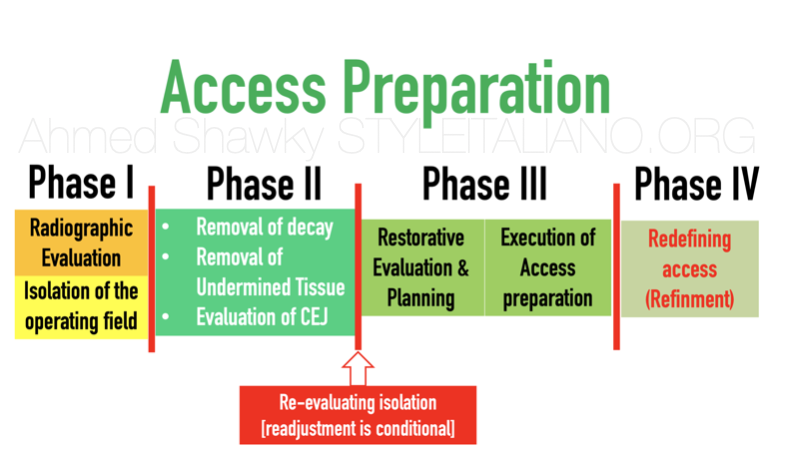
Fig. 1
Phases of access cavity preparation
-The basic steps of access preparation in contemporary Endodontics involves a series of procedures in a logical order that can be summarized as follows;
Phase I: Radiographic evaluation of the pulp chamber morphology in order to have an idea about the most likely internal anatomy. This is followed by isolation of the tooth.
Phase II: Removal of decayed and undermined tooth tissues as well as existing defective restorations (if any) under magnification to avoid sacrificing virgin dentin. Evaluation of the CEJ is essential in this phase to identify the preparation coordinates, also this will help in visualization of the most likely outline of the preparation.
Phase III: Evaluation of the remaining sound tissues and correlation with the restorative treatment plan. This phase ends by execution of the access preparation based on the results given by the first two phases.
Phase IV: Redefining (refinement) of the preparation: in many cases, further refinement of the preparation is needed to allow complete removal of the pulp tissues and unrestricted access to the root canal system.
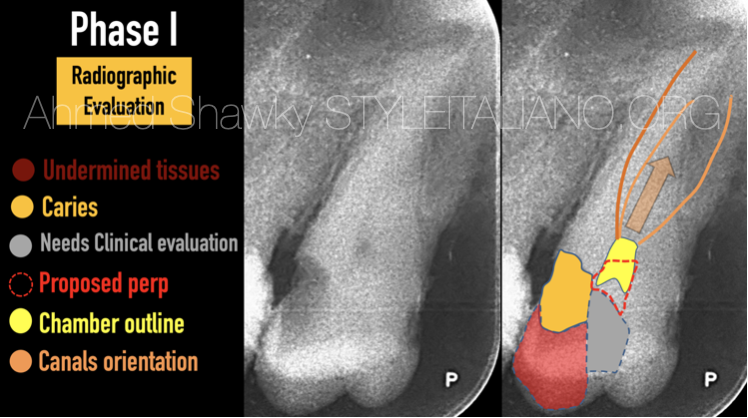
Fig. 2
Phase I: Radiographic evaluation
Radiographic evaluation prior to access preparation inform the clinician about; the chamber size and outline, the rough extent of decayed tissues, parts of the tooth structure needing clinical evaluation as well as the canals orientation.
From the preoperative image, the clinician can also preliminarily plan the cavity preparation in relation to the previously mentioned givens.
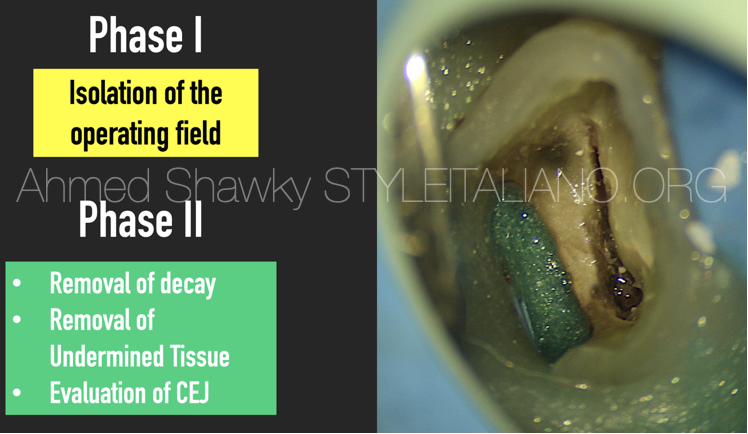
Fig. 3
Phase II: Removal of decay/defective restoration
After isolating the tooth, the decayed and undermined tooth tissues are removed. This step is essential to determine the restorability of the treated tooth.
In many instances, Evaluation of the CEJ is mandatory as it serves as a guidance for the clinician in planning and execution of the access cavity.
After this step, evaluation of the current isolation is mandatory to avoid leakage during treatment. Minor leakage problems can be solved by a liquid dam material or light curable gingival barrier. In cases with major isolation problems after removal of decay/restorations, an alternative isolation plan must be done before proceeding forward
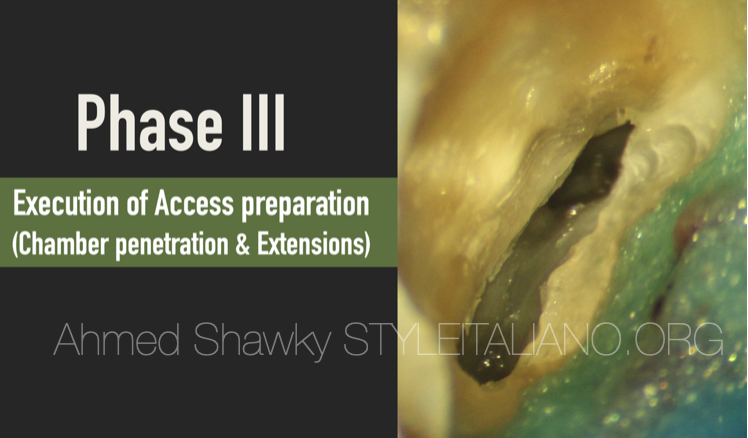
Fig. 4
Phase III: Penetration of the chamber roof and deroofing
This phase involves evaluation of the remaining sound tissues and restorative treatment planning prior to execution of the access preparation because many times, after removal of diseased tissues, the tooth is found to be non-restorable. When the tooth is judged restorable, penetration into the pulp chamber is done under magnification. By the end of this step, most of the chamber roof is removed which allows most of the chamber tissues to be excavated.
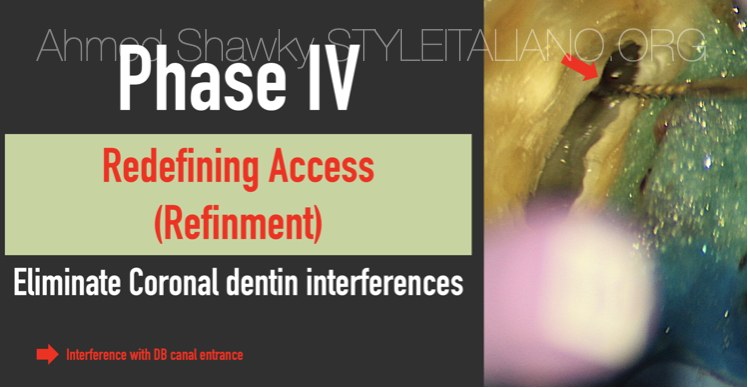
Fig. 5
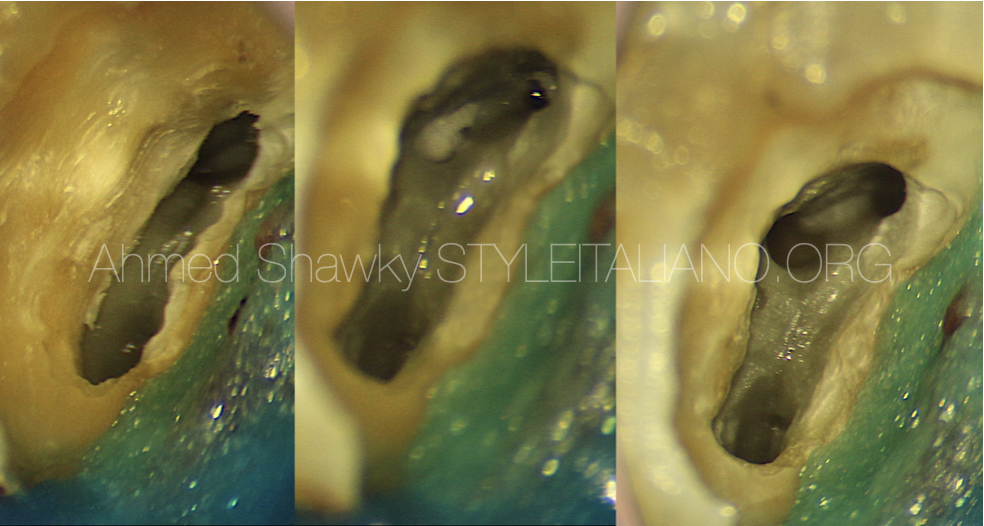
Phase IV: Redefining (Refinement) Access
This phase is complementary to the previous phase. The rationale for redefining access is to eliminate coronal dentin interfering with the instruments. This would prevent incidence of many errors during treatment, such as; ledges (transportations) and instrument separation. It also help to eliminate some roof overhangs and therefore allows complete removal of the coronal pulp tissue, in addition to providing smooth preparation walls. In maxillary molars, redefining access cavities includes an essential maneuver involving removal of a mesial dentin bulge to confirm the presence or absence of the MB2.
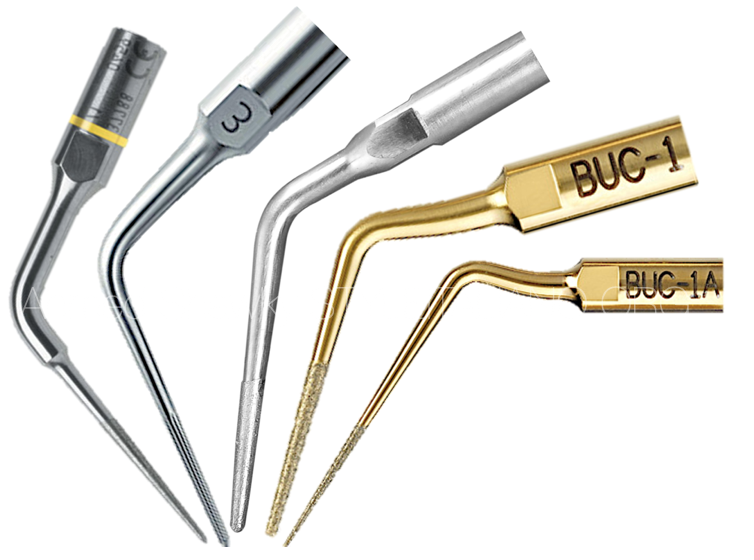
Fig. 6
Tools used for cavity refinement
The most important tool is magnification aided by coaxial illumination. Cavity adjustments using naked eye is impossible.
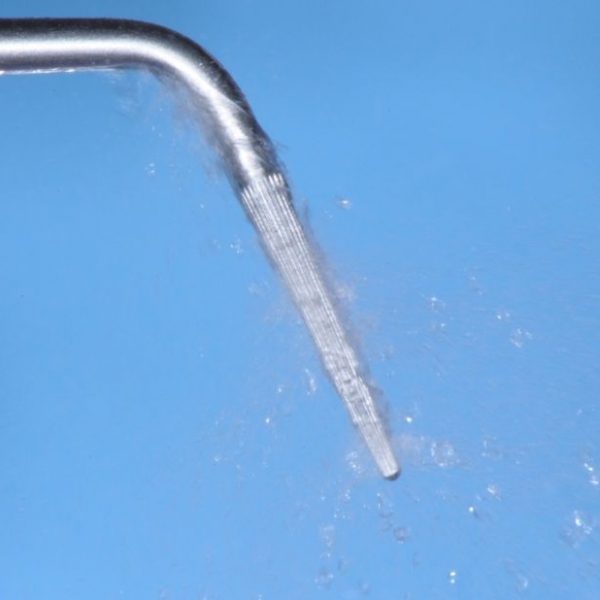
The executive tools in this step are “medium power Ultrasonic tips”
There are variety of ultrasonic tips for this job, such as;
1-StartX tips 1,2 and 3
2- Satelec ET20 and ET20D
3- Obtura spartan BUC-1 (for posterior teeth) and BUC-1A (for single rooted teeth)
For better visualization during refinement, it is better to be used dry but in the presence of a wet chamber. This will prevent damaging coronal dentin an in the same time allows visual control of the procedure

Fig. 7
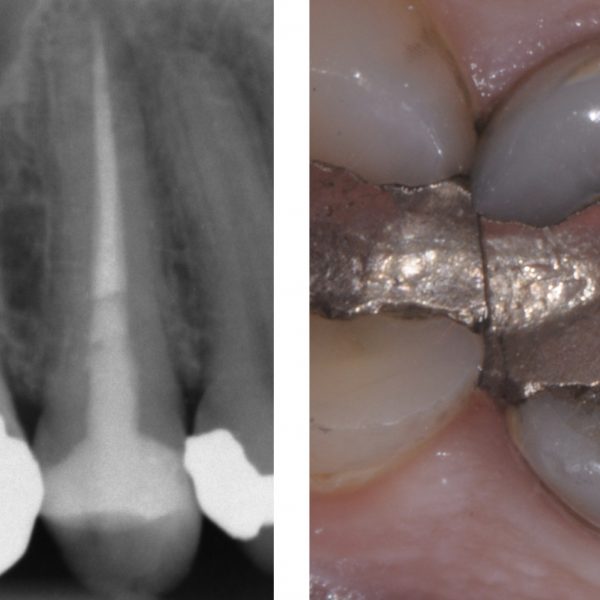
Maxillary second molar with abnormal anatomy
The pulp chamber was atypical in terms of shape and size, being very narrow buccally and wider palatally. It was not possible to introduce any files into the root canal system except in the palatal canal.
It was impossible to perform any extensions using rotary diamonds as this might endanger the PCD and weaken the tooth.
Decision was taken to refine the cavity using ET20D ultrasonic tip. This revealed the full chamber outline and it was possible to UNCOVER all four root canals.
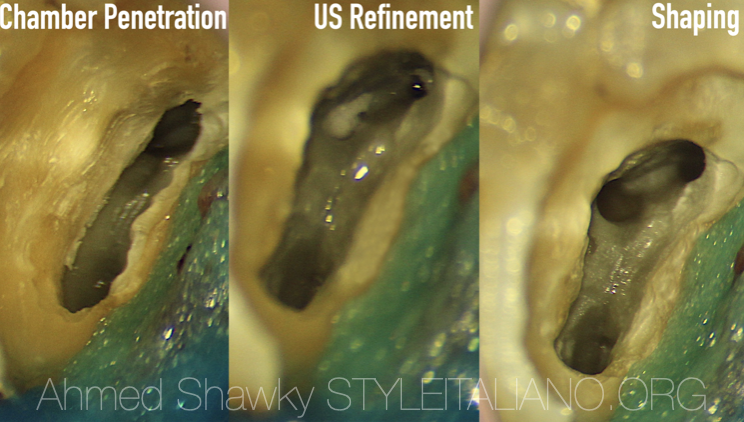
Fig. 8
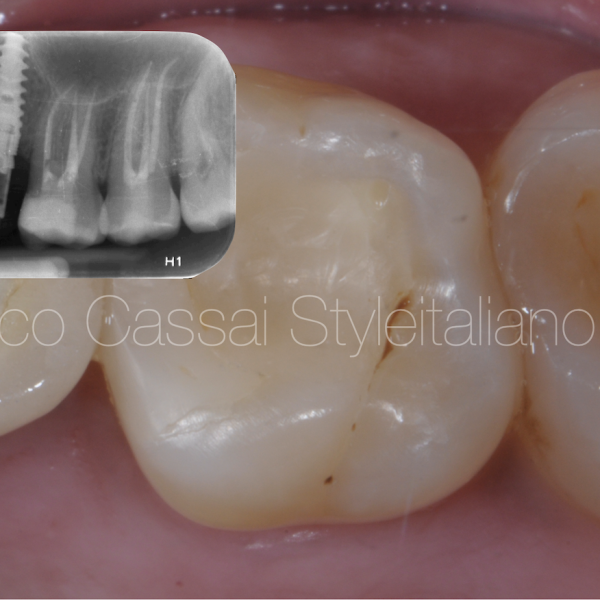
Narrow oval chamber, yet 3 root canals
Although the presence of only two root canals in maxillary second molars has been reported in literature. We should take some time to confirm this morphology, first by radiographic evaluation and then by clinical inspection.
Before refinement, the chamber was oval. This was not consistent with the radiographic data of the tooth which proved the presence of 3 roots (figure 2)
Chamber refinement was done using ET20 ultrasonic tip. This revealed the typical outline of the access in a maxillary second molar with 3 roots and 3 canals.
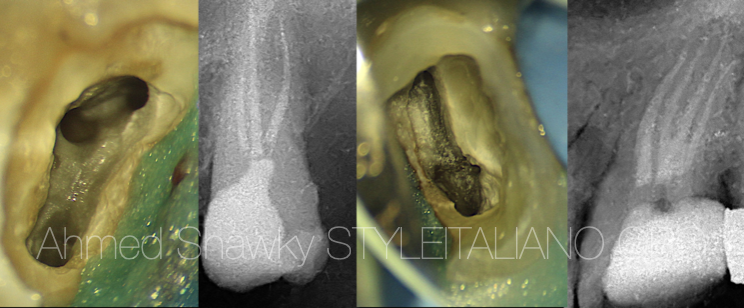
Fig. 9
Ultrasonic refinement of the access preparation will enable the clinician to easily clean and shape the root canal system with minimal scarification of sound dentin.
It also facilitates application of all modern and classic obturation materials and devices to optimally seal the root canal system.
Conclusions
- Correct execution of a dynamic and conservative access cavity preparation is the first and most important step towards excellence in endodontic treatments
- It is not recommended to redefine or refine access preparations using high speed rotary diamond or carbide tools. Using these tools might compromise the fracture resistance of the endodontically treated tooth due to uncontrolled and excessive loss of dentin.
- Access refinement can only be accurately and conservatively performed in the presence of the triad of Magnification, co-axial illumination and ultrasonic instruments.
- Access refinement step using ultrasonics allows the clinician to reach, explore, manage and seal the root canal system with less impedance, less iatrogenic errors and less removal of virgin dentin.
Bibliography
1- Paul Krasner and Henry J. Rankow, Anatomy of the Pulp-Chamber Floor, Journal of Endodontics, VOL. 30 )1( 2004
2- Silva EJNL, Pinto KP, Ferreira CM, Belladonna FG, De-Deus G, Dummer PMH, Versiani MA. Current status on minimal access cavity preparations: a critical analysis and a proposal for a universal nomenclature. International Endodontic Journal. doi:10.1111/iej.13391