Use of internal bleaching in prosthetic cases
26/09/2024
Federico Ceroni
Warning: Undefined variable $post in /home/styleendo/htdocs/styleitaliano-endodontics.org/wp-content/plugins/oxygen/component-framework/components/classes/code-block.class.php(133) : eval()'d code on line 2
Warning: Attempt to read property "ID" on null in /home/styleendo/htdocs/styleitaliano-endodontics.org/wp-content/plugins/oxygen/component-framework/components/classes/code-block.class.php(133) : eval()'d code on line 2
Matching the color of dental crowns to discolored tooth abutment is a tough challenge in modern dentistry. When a tooth abutment is discolored—due to staining, injury, or previous treatments—it can be hard to make a crown that looks natural and blends well with the surrounding teeth.
The difficulty comes from several factors: the original color of the tooth, the type of discoloration, and the materials used for the crown. Although new materials and techniques have made it easier to match colors, getting a perfect match is still not always possible. This can affect the overall look of the dental work.
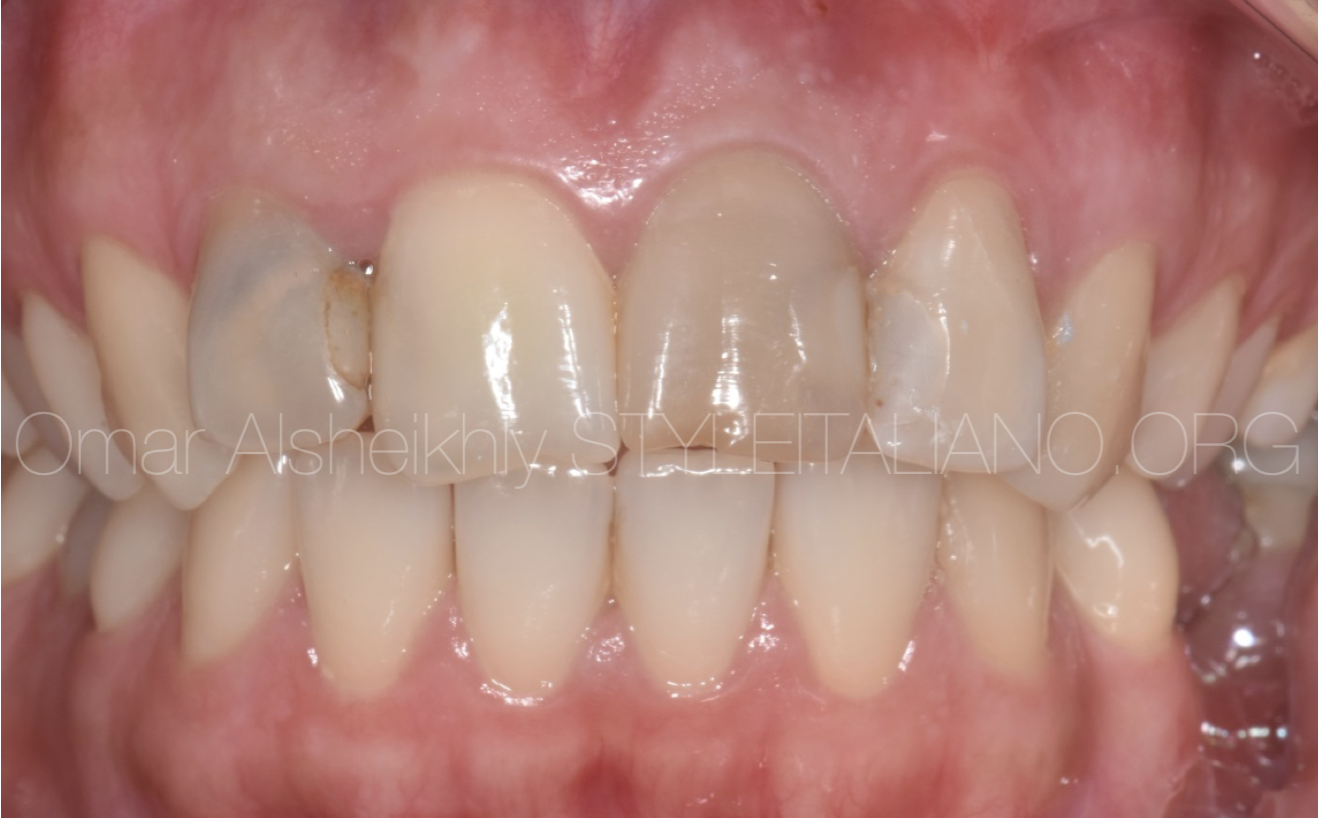
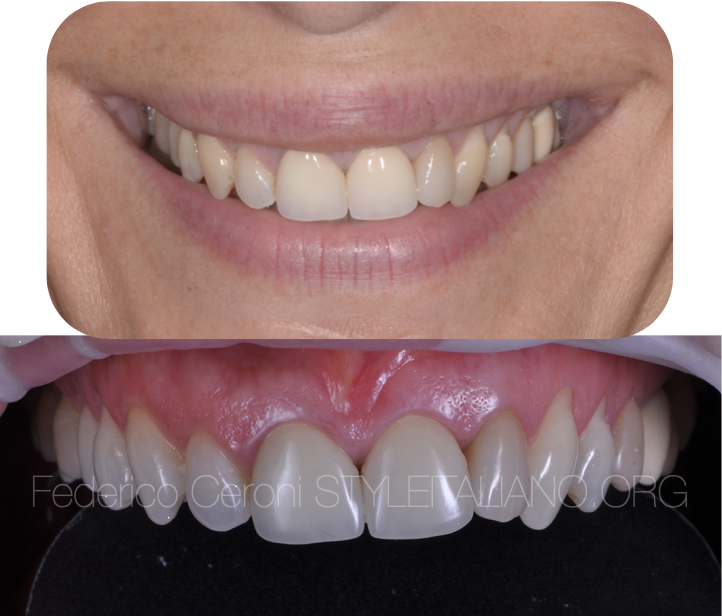
A 40-year-old female patient presented with the desire to enhance her smile by replacing the existing crowns on her teeth 11, 21, and 22. The patient was seeking a more aesthetically pleasing result to improve the overall appearance of her smile. Before proceeding with the new crowns and veneers on the elements 13-12-23-24-25-15-14, it was necessary an endodontic retreatment of the root canals due to the presence of a poor endodontic treatment on 11-21-22.
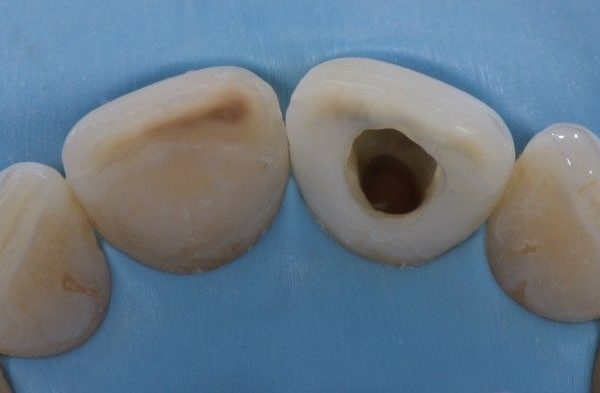
Upon removal of the old crowns, it was also discovered that the tooth abutment of tooth 11 exhibited significant discoloration. This discoloration posed a challenge, as it would affect the final aesthetic outcome if not properly managed. To ensure the best possible result, we planned to perform internal bleaching of tooth 11 to address the discoloration before fabricating the new crown.
Our approach involves using translucent zirconia for the new crown, which could otherwise be compromised by the existing discoloration. The internal bleaching will help to restore the natural color of the tooth stump, thus allowing the translucent zirconia crown to achieve a more natural and aesthetically pleasing appearance.
This case highlights the importance of addressing both the structural and aesthetic aspects of dental restorations to achieve optimal results for the patient.
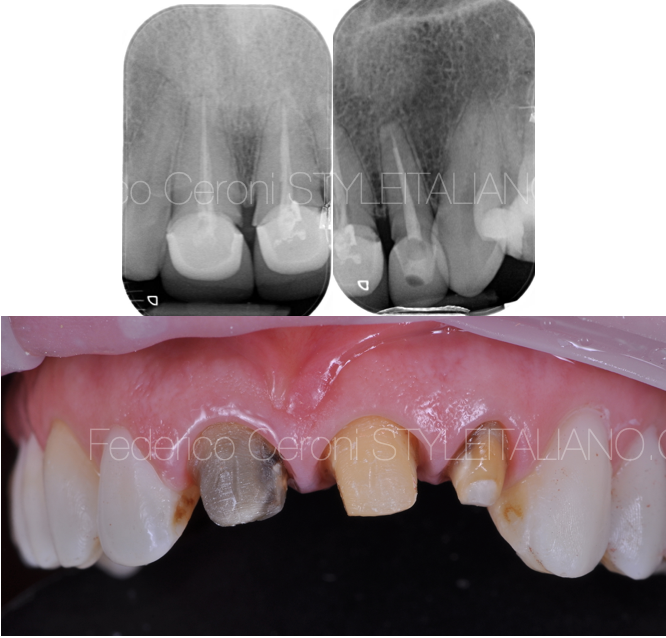
Fig. 1
The old crowns were successfully removed from the patient's teeth 11, 21, and 22. Following the removal, we proceeded with the endodontic retreatment for these teeth.
The retreatment involved several key steps:
- Access Opening: The initial step was to re-establish access to the root canals by carefully removing any remaining filling material and old root canal sealer.
- Cleaning and Shaping: We employed rotary endodontic instruments to clean and shape the canals. These instruments allowed for efficient removal of debris and a precise shaping of the root canal system.
- Disinfection: After shaping, the canals were thoroughly disinfected using naoclo solution to ensure the elimination of any residual bacteria.
- Filling: The final step in the retreatment process was to obturate the cleaned and shaped canals. We used gutta-percha and employed a vertical warm condensation technique to achieve a dense and effective seal within the root canals. This method ensures a thorough filling of the root canal space, reducing the risk of future infection.
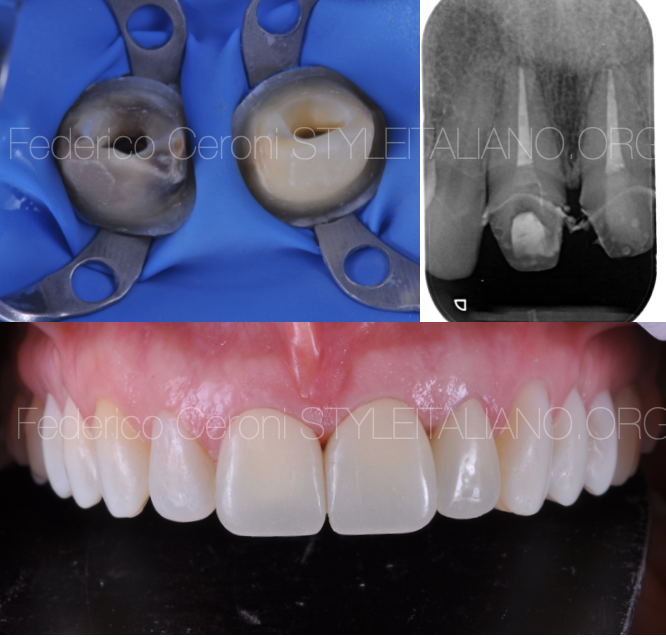
Fig. 2
Following the completion of the endodontic retreatments, the next step was to reconstruct the treated teeth using adhesive composite materials. This process was carried out with the following steps:
- Etching: The internal surfaces of the root canal access openings were etched with ortophosphoric acid. This step roughens the tooth surface, improving the bonding strength of the composite material.
- Rinsing and Drying: After etching, the area was thoroughly rinsed with water to remove any residual etching gel. The tooth was then gently dried using a gentle air stream to avoid overdrying the dentin.
- Bonding Agent Application: A bonding agent was applied to the etched surfaces of the tooth. This adhesive was carefully spread to ensure uniform coverage and then light-cured according to the manufacturer's instructions to create a strong bond between the tooth structure and the composite material.
- Composite Build-Up: The teeth were then reconstructed with adhesive composite resin. Layering techniques were used to build up the tooth structure gradually, ensuring proper contours and occlusion. For tooth 11, a different approach was necessary due to its significant discoloration:
- an adhesive barrier was applied to the root canal system of 11 with an adhesive procedures and a flowable composite. This was carefully placed to ensure an effective barrier for the bleaching agent, the bleaching agent was inserted into the access cavity of tooth 11 to address the discoloration. This agent was allowed to act over a specified period to lighten the internal discoloration. The access cavity was temporarily sealed to protect the whitening agent and prevent contamination.
After the adhesive composite reconstructions and the application of the whitening agent, provisional crowns were placed over the prepared teeth. These temporaries were used to protect the teeth and maintain proper function and aesthetics while the whitening agent worked on lightening the discoloration of tooth 11.
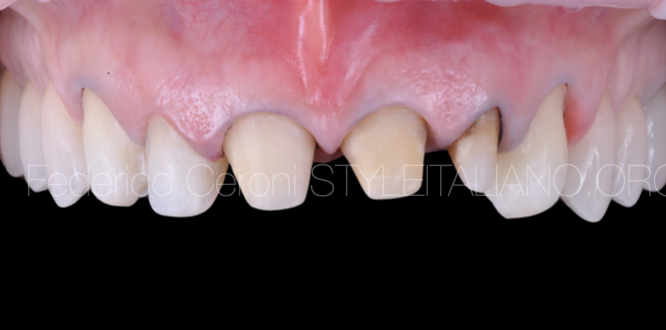
Fig. 3
The whitening agent was applied for two sessions, each followed by evaluation. After the second application, the desired level of whitening was achieved, allowing us to proceed with the next steps.
With the discoloration effectively addressed, we moved forward with the preparation for the final restorations:
The adjacent teeth were prepared for veneers. Accurate impressions of the prepared teeth were taken.
Based on the final impressions, the definitive crowns for teeth 11-21 and 22, and the veneers for the adjacent teeth, were fabricated. This process ensures that the final restorations will have the appropriate fit, function, and aesthetic appearance.
By following these steps, we ensured that the final crowns and veneers would be both functional and visually pleasing, completing the restorative work with optimal results.
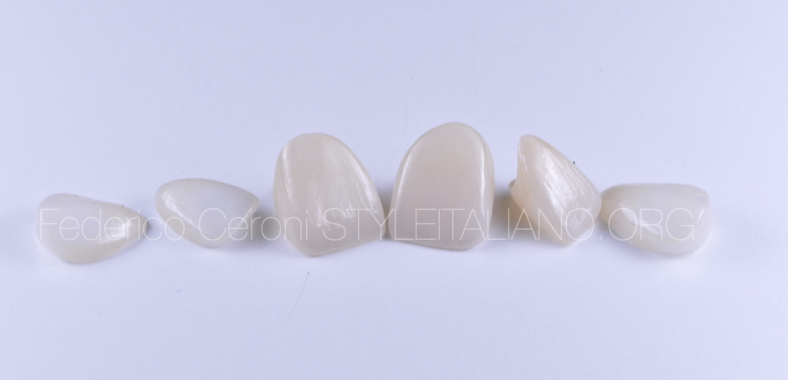
Fig. 4
Upon receipt of the fabricated crowns and veneers, the following steps were carried out:
- Try-In: Each restoration was carefully tried in to ensure proper fit, occlusion, and aesthetic appearance. Adjustments were made as needed to achieve the best possible result.
- Adhesive Cementation: Once the fit and aesthetics were confirmed, the restorations were permanently cemented using an adhesive technique. The adhesive was then cured with a dental light to ensure a strong bond between the tooth structure and the restorations.
- Final Adjustments and Polishing: After cementation, final adjustments were made to ensure proper occlusion and comfort. The restorations were polished to enhance their smoothness and shine, completing the restoration process.
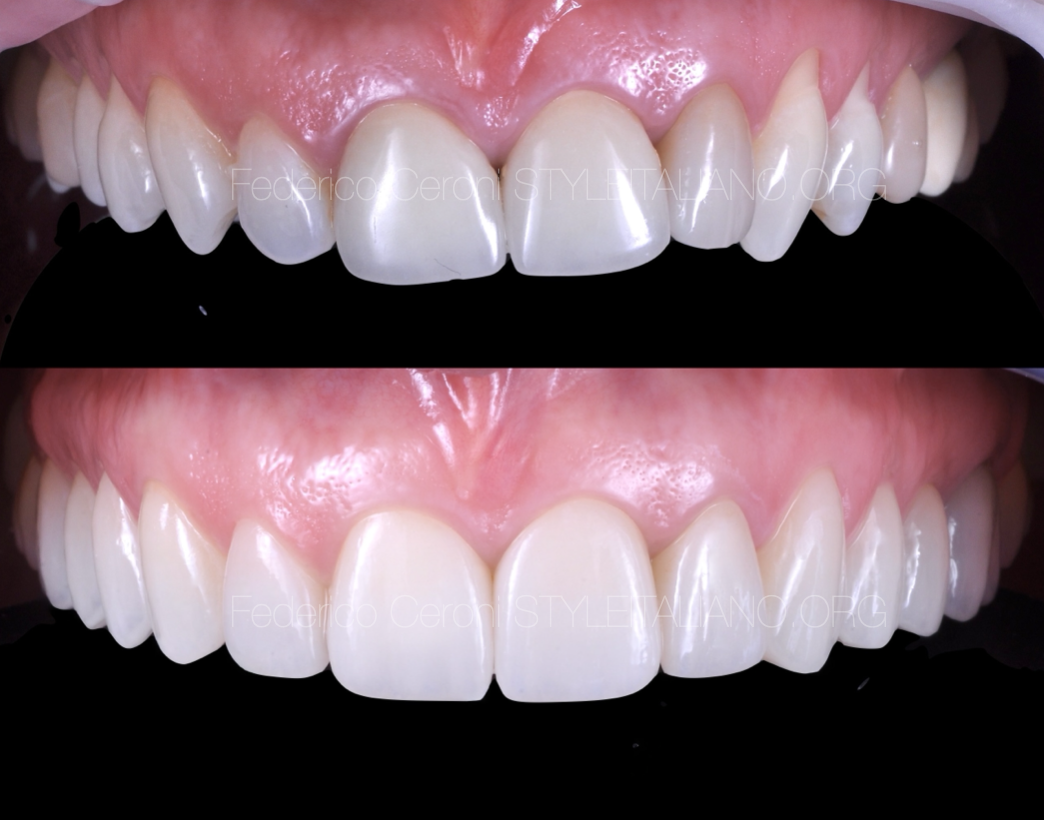
Fig. 5
The final restorations have been successfully placed, and the results are clearly visible in the photographs. The careful application of internal bleaching prior to fabricating the crowns and veneers was crucial for achieving the perfect aesthetic outcome. The photos demonstrate how the restorations seamlessly blend with the surrounding natural teeth, showcasing a high level of mimetic accuracy
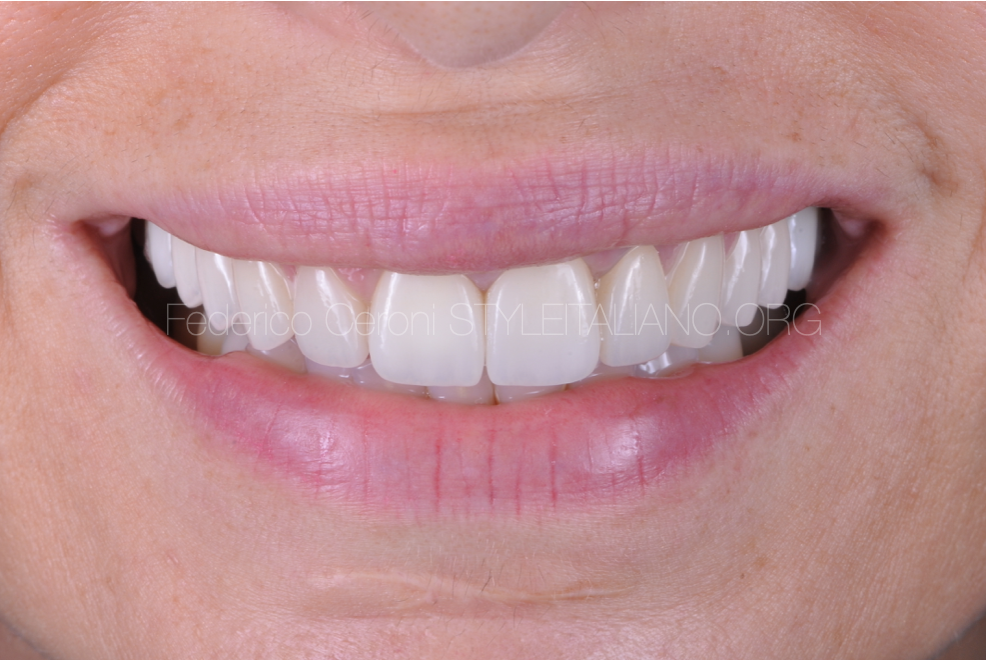
Fig. 6
Without the internal whitening, the significant discoloration of the tooth abutment would have compromised the ability to achieve this level of integration and natural appearance. The bleaching procedure allowed us to correct the underlying discoloration, thereby ensuring that the translucent zirconia crowns matched the natural tooth color flawlessly.
Conclusions
Internal bleaching plays a crucial role in cases involving discolored tooth abutments, particularly when planning for high-aesthetic restorations such as translucent zirconia crowns. By addressing the internal discoloration effectively, internal bleaching ensures that the final restorative work achieves a natural and uniform appearance. This step is essential for overcoming the limitations of restorative materials and achieving optimal aesthetic outcomes, ultimately enhancing both the functional and visual aspects of dental restorations.
Bibliography
"Internal Bleaching of Non-Vital Teeth: A Review"
- Authors: G. S. Chaves, J. S. Briso, M. G. Souza, A. M. de Almeida
- Journal: Journal of Endodontics
- Year: 2008
- DOI: 10.1016/j.joen.2007.09.015
- Summary: This review article discusses various techniques and outcomes of internal bleaching for non-vital teeth, providing insights into the effectiveness of different whitening agents and methods.
"Effectiveness of Internal Bleaching on Darkly Discolored Teeth: A Clinical Study"
- Authors: M. L. Matis, G. A. Cochran, A. M. Eckert
- Journal: Operative Dentistry
- Year: 2009
- DOI: 10.2341/08-27
- Summary: This clinical study evaluates the effectiveness of internal bleaching in improving the color of discolored teeth, with an emphasis on the clinical outcomes and factors influencing success.
"The Influence of Internal Bleaching on the Fracture Resistance of Endodontically Treated Teeth"
- Authors: P. T. Peters, R. K. V. Koc, C. C. Richards
- Journal: Journal of Dentistry
- Year: 2011
- DOI: 10.1016/j.jdent.2010.09.009
- Summary: This article investigates the impact of internal bleaching on the structural integrity of endodontically treated teeth, providing valuable information on how whitening affects tooth strength.
"Esthetic Management of Discolored Teeth: Internal Bleaching and Composite Resin Restorations"
- Authors: L. C. G. de Oliveira, M. A. F. de Lima, J. A. L. Santos
- Journal: Journal of Esthetic and Restorative Dentistry
- Year: 2015
- DOI: 10.1111/jerd.12136
- Summary: This paper explores the combined use of internal bleaching and composite resin restorations in managing discolored teeth, discussing techniques and aesthetic outcomes.
"A Comparison of Internal Bleaching Techniques: A Systematic Review"
- Authors: S. A. Johnson, R. M. Smith, D. R. Thompson
- Journal: Journal of Conservative Dentistry
- Year: 2017
- DOI: 10.4103/0972-0707.208123
- Summary: This systematic review compares various internal bleaching techniques, summarizing their efficacy, safety, and impact on the overall treatment of discolored teeth.
