Microscope-Guided Minimally Invasive Repair of Root Perforations in Endodontic Retreatment
16/04/2026
Warning: Undefined variable $post in /home/styleendo/htdocs/styleitaliano-endodontics.org/wp-content/plugins/oxygen/component-framework/components/classes/code-block.class.php(133) : eval()'d code on line 2
Warning: Attempt to read property "ID" on null in /home/styleendo/htdocs/styleitaliano-endodontics.org/wp-content/plugins/oxygen/component-framework/components/classes/code-block.class.php(133) : eval()'d code on line 2
Iatrogenic perforations represent a significant procedural complication in endodontic practice and may critically influence the prognosis of the affected tooth if not diagnosed and managed appropriately. A perforation is defined as a pathological or mechanical communication between the root canal system and the external tooth surface, resulting in disruption of the natural barrier between the pulp space and the surrounding periodontal tissues (1,2). This breach facilitates the ingress of microorganisms, inflammatory mediators, and irrigants into the periodontal ligament space, potentially initiating a cascade of inflammatory events that may compromise periodontal attachment and long-term tooth survival.
Among the various types of perforations, those occurring at the pulpal floor are particularly detrimental. Their close proximity to the furcation region places them within a biologically critical zone, where even minimal contamination can result in rapid periodontal breakdown, epithelial downgrowth, and eventual loss of attachment. Furthermore, the complex anatomy of molar teeth, combined with limited visibility and access, increases both the risk of occurrence and the technical difficulty associated with their management.
Historically, perforations—especially those associated with delayed diagnosis or microbial contamination—were considered to carry a guarded to poor prognosis, often leading to extraction as the preferred treatment option. However, the past two decades have witnessed a paradigm shift in endodontic practice. Advances in biomaterials, particularly the introduction of calcium silicate–based cements such as mineral trioxide aggregate (MTA), have revolutionised the management of such defects by providing superior sealing ability, biocompatibility, and the capacity to promote hard tissue healing (4,5). These materials have enabled clinicians to achieve predictable outcomes even in challenging clinical scenarios that were previously deemed untreatable.
In parallel, the integration of enhanced visualisation techniques—most notably the use of dental operating microscopes—has significantly improved the clinician’s ability to identify, assess, and manage perforations with precision. The adjunctive use of specialised delivery systems, such as the Micro-Apical Placement (MAP) system, further facilitates controlled placement of repair materials, minimising extrusion and ensuring accurate adaptation at the defect site. Collectively, these advancements have supported a transition toward minimally invasive, biologically driven treatment strategies that prioritise preservation of tooth structure and optimisation of healing outcomes.
Within this evolving framework, the concept of corrective root canal therapy (C-RCT) has emerged as a targeted and conservative approach to managing endodontic failures. Rather than undertaking complete retreatment in all cases, C-RCT focuses on addressing the specific etiological factor responsible for failure, thereby reducing unnecessary removal of dentine and preserving the structural integrity of the tooth. This philosophy is particularly relevant in the management of iatrogenic perforations, where precise and conservative intervention can significantly enhance prognosis.
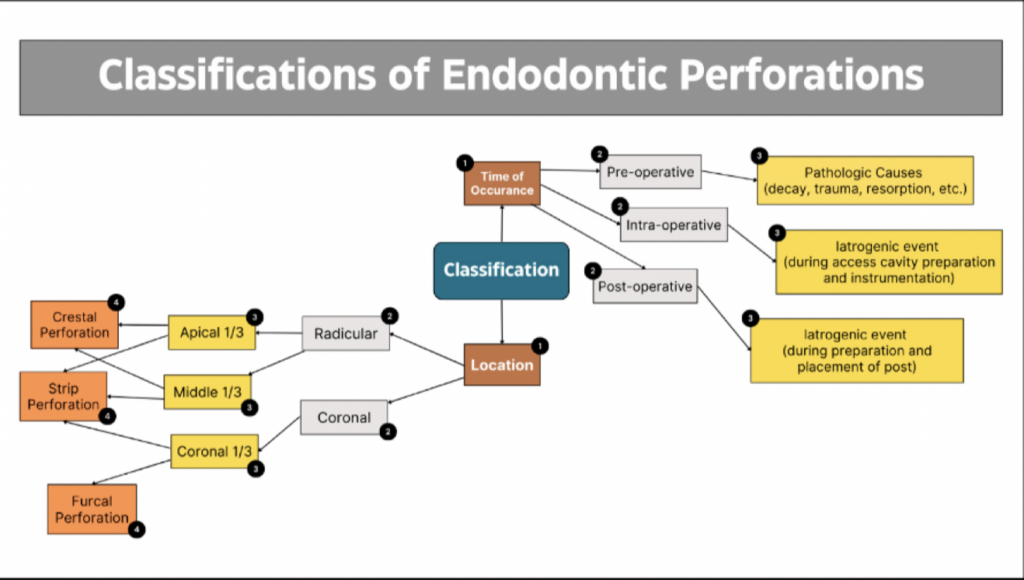
This chapter illustrates the application of these contemporary principles through the clinical management of a pulpal floor perforation in a mandibular molar. The case highlights the importance of early diagnosis, strategic decision-making, and meticulous execution under magnification. Endodontic perforations can be broadly classified based on their time of occurrence—such as procedural or pathological—and their anatomical location, including coronal, mid-root, or apical regions. Each of these factors has important implications for both prognosis and treatment planning, as summarised in Figure 1 (1,2).
Stepwise description of the treatment performed:
After administration of local anaesthesia in tooth 36, strict rubber dam isolation was achieved to ensure an aseptic operating field (Fig. 3). The existing access cavity was carefully refined to improve visualisation of the pulpal floor. All procedures were performed under a dental operating microscope, allowing enhanced precision and minimising the risk of further procedural damage. The pulp chamber was gently debrided, and the perforation site was clearly visualised in the furcation region, exhibiting active bleeding consistent with communication with the periodontal tissues.
The initial phase of management focused on haemostasis and decontamination of the defect (Fig. 4). Controlled irrigation was performed using 3% sodium hypochlorite delivered through 27-gauge side-vented needles, allowing effective disinfection while minimising the risk of irrigant extrusion into the periodontal space. Bleeding was subsequently controlled using sterile paper points, creating a suitable environment for placement of the repair material (Video 1).
Once haemostasis was achieved, attention was directed toward sealing the perforation. Mineral trioxide aggregate (MTA; Produits Dentaires, Switzerland) was mixed to a putty-like consistency and delivered to the defect using the MAP system (Fig. 5). This system facilitated precise placement within the confined furcation area (Video 2). The material was placed incrementally under magnification and gently compacted with micro-pluggers to ensure optimal adaptation to the surrounding dentinal walls while avoiding extrusion. Careful inspection confirmed complete sealing of the defect.
A moist microbrush was placed over the MTA to promote adequate setting (Video 2). After initial setting, the access cavity was temporarily sealed. At the subsequent visit, the integrity and stability of the MTA repair were confirmed clinically, demonstrating a well-adapted seal at the perforation site (Fig. 6).
Stepwise description of the treatment performed:…continued….
Following successful repair, nonsurgical retreatment of the root canal system was undertaken. Residual intracanal medicament was removed using rotary files, which enabled effective cleaning while preserving the original canal anatomy. Canal patency was established, and working lengths were determined using an electronic apex locator and verified radiographically. Cleaning and shaping were performed in a crown-down sequence to ensure adequate canal enlargement for irrigation without compromising canal curvature.
Irrigation during retreatment was carried out using 3% sodium hypochlorite delivered via 27-gauge side-vented needles to enhance irrigant penetration while limiting apical extrusion. A final rinse with EDTA was performed to remove the smear layer and optimise canal cleanliness. The canals were subsequently dried using sterile paper points.
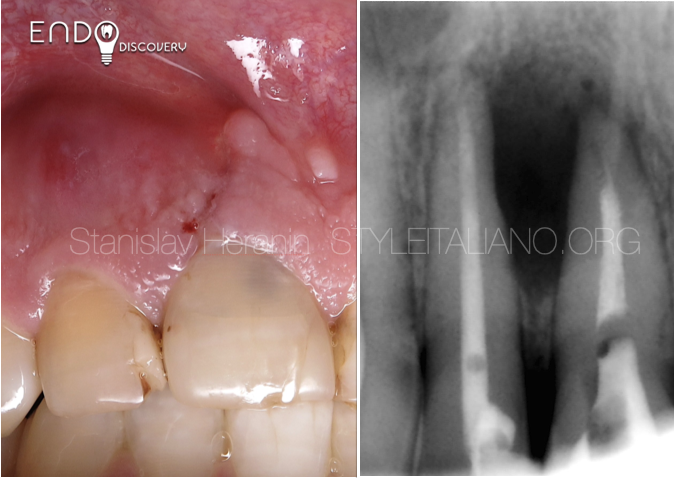
Obturation was completed using a single-cone technique in conjunction with a bioceramic sealer, providing a homogenous and biologically favourable seal within the canal system and complementing the previously placed MTA repair (Video 3; Fig. 7).
A definitive coronal seal was achieved using SDR flowable composite, placed incrementally to create a stable core build-up. This material allowed efficient bulk placement with reduced polymerisation stress, contributing to both structural reinforcement and long-term sealing ability.
The procedure was finalised with occlusal adjustment, and the patient was advised regarding the need for definitive cuspal coverage restoration at a subsequent appointment. This structured approach ensured effective sealing of the perforation, thorough disinfection of the canal system, and preservation of tooth structure, in accordance with contemporary principles of minimally invasive endodontics and targeted retreatment.
Stepwise description of the treatment performed: continued….
Outcome and Follow-Up
At post-operative review, the patient reported complete resolution of symptoms, with no residual pain or discomfort. Clinical examination demonstrated absence of tenderness to percussion and normal functional response, indicating successful resolution of the inflammatory process.
Radiographic assessment at follow-up revealed evidence of progressive healing in the furcation region, with no signs of persistent radiolucency or ongoing pathology. These findings suggest favourable biological repair and re-establishment of periodontal integrity.
The positive outcome observed in this case aligns with existing literature demonstrating high success rates of perforation repair using mineral trioxide aggregate (MTA), particularly when management is carried out promptly, under magnification, and within a well-controlled clinical environment.
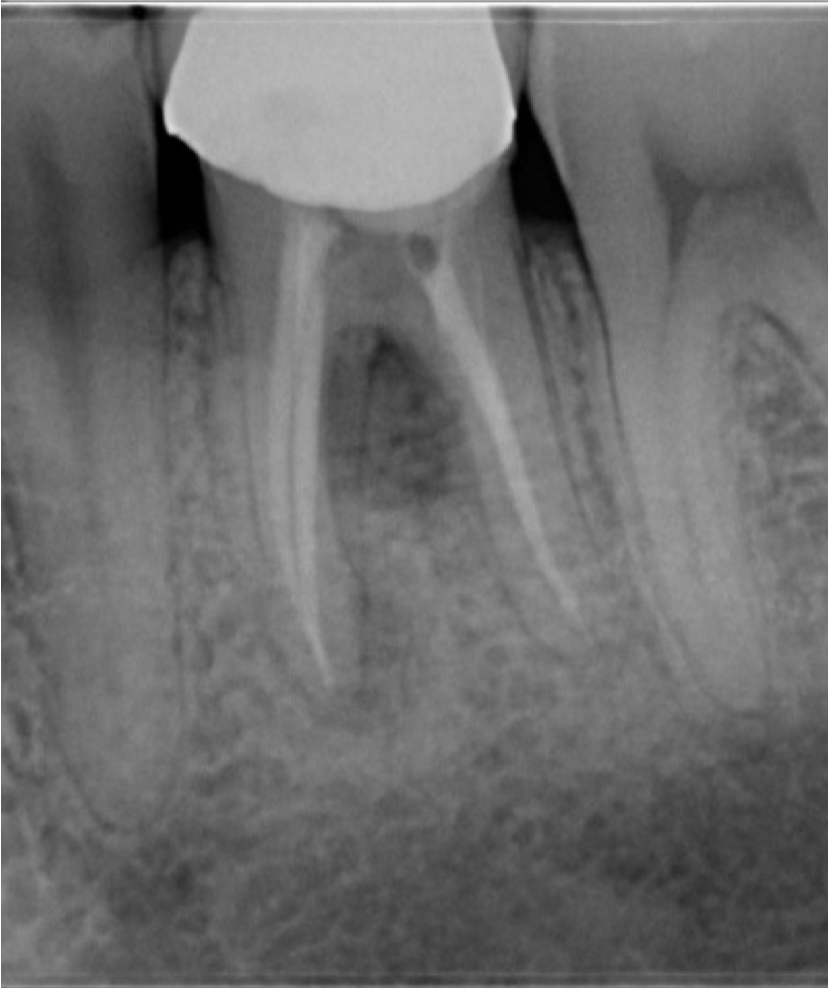
Fig. 1
Case History
A 42-year-old male patient was referred with persistent pain and discomfort associated with the mandibular left first molar (tooth 36). The patient reported a history of previous endodontic intervention, following which the symptoms had failed to resolve. Clinical examination revealed tenderness to percussion along with discomfort during mastication, suggestive of ongoing periapical pathology.
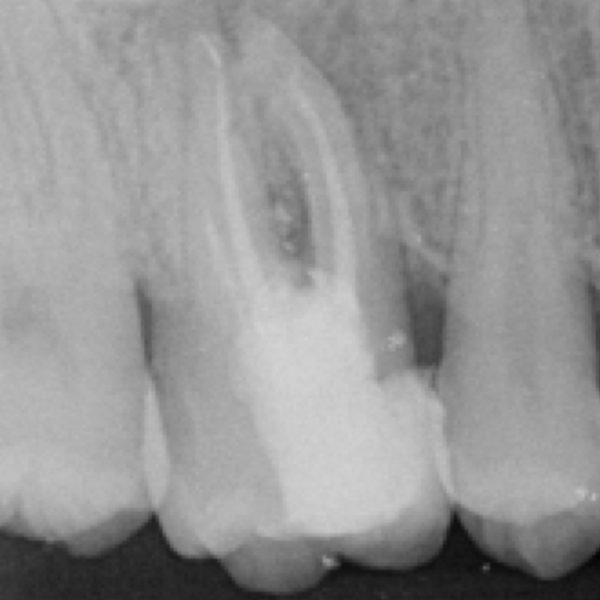
Radiographic assessment demonstrated an inadequately treated root canal system, accompanied by a radiolucency in the furcation region. These findings raised a strong suspicion of a procedural complication, most likely a perforation (Fig. 1).
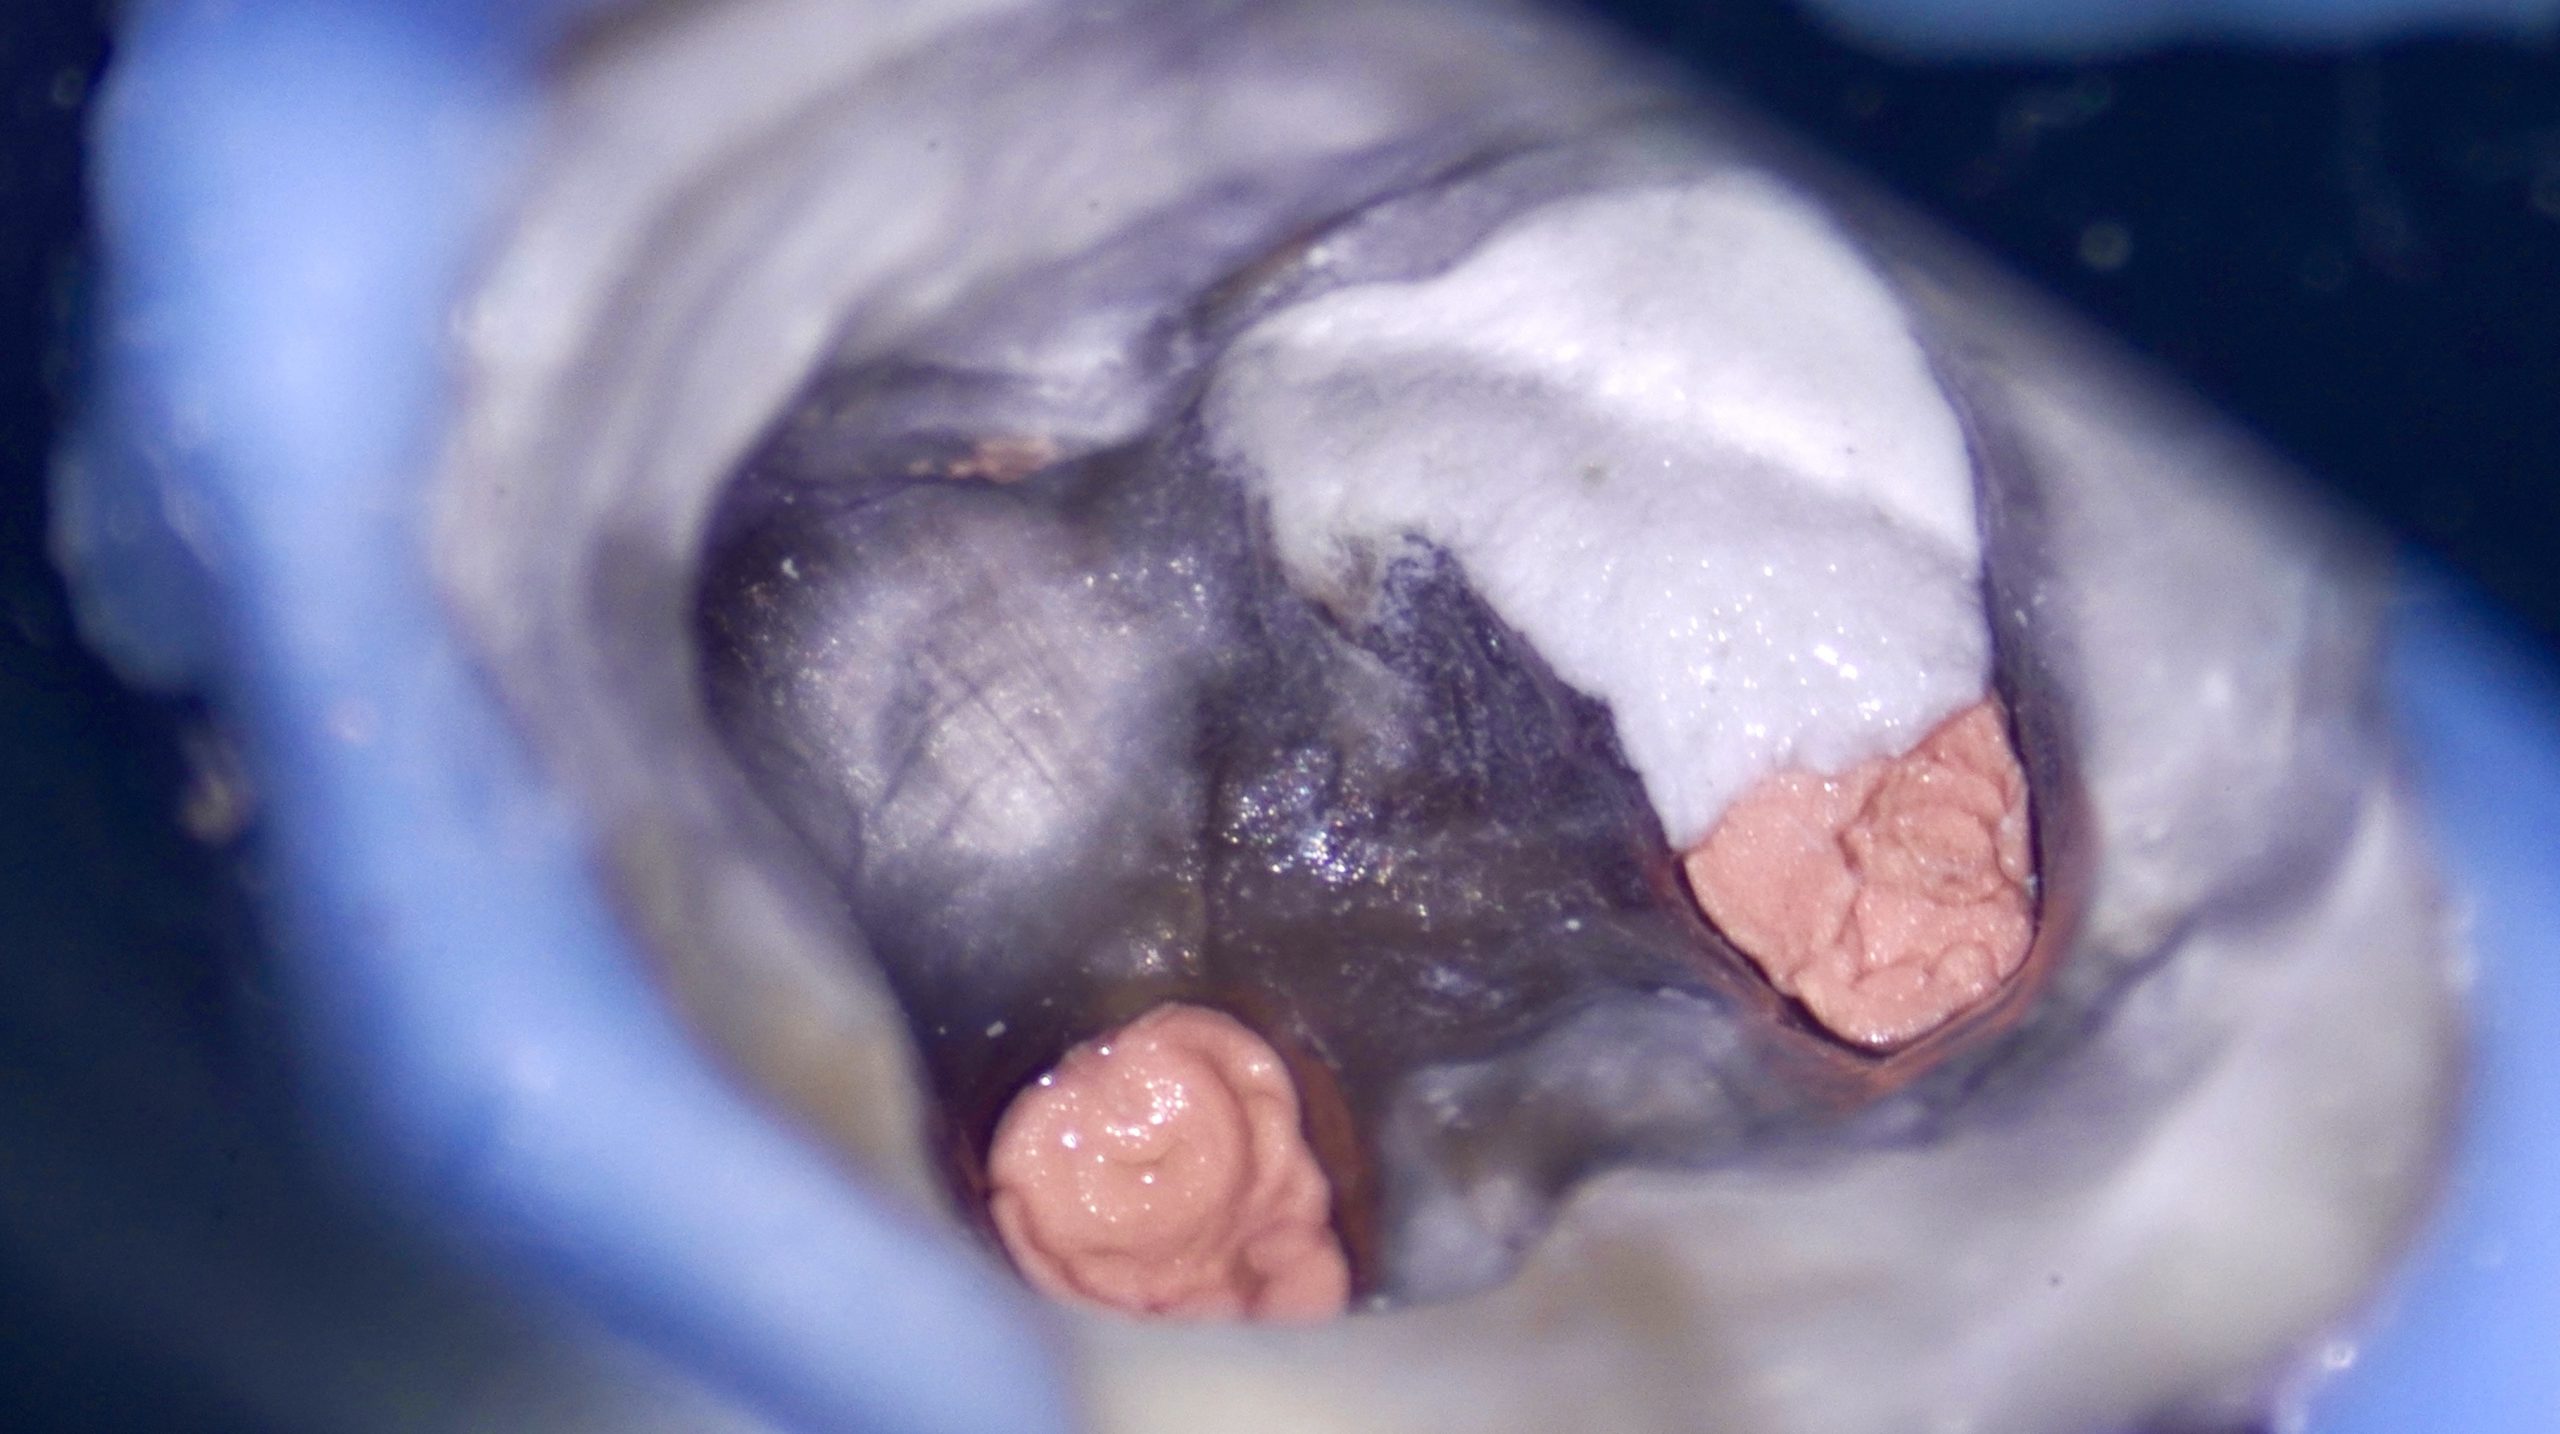
Access refinement was performed under rubber dam (Fig 2) and dental operating microscope to allow enhanced visualisation. Upon careful inspection, a pulpal floor perforation was clearly identified in the furcation area, adjacent to the distal canal (Fig. 3). The defect exhibited active bleeding and a direct communication with the periodontal tissues, confirming its biological significance and potential impact on prognosis.
Further evaluation of the canal system revealed incomplete debridement, with evidence of insufficient canal preparation and the presence of residual intracanal medicament (Fig. 3). These findings indicated suboptimal prior treatment and contributed to the persistence of symptoms.
Based on the clinical and radiographic findings, a diagnosis of previously initiated therapy with an iatrogenic pulpal floor perforation and associated apical periodontitis was established. In line with contemporary minimally invasive principles, the treatment plan focused on targeted repair of the perforation, followed by completion of root canal therapy to achieve biological and functional resolution.
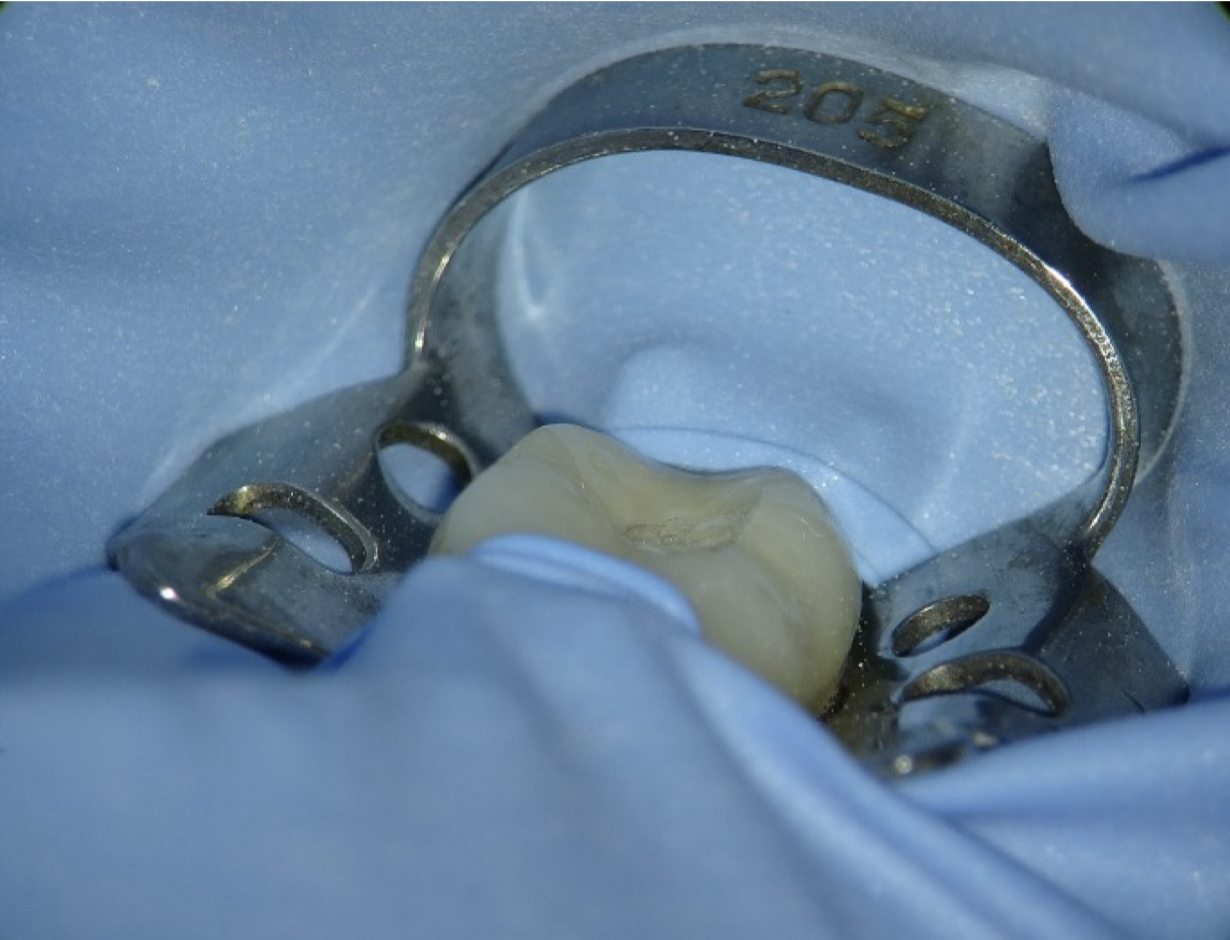
Fig. 2
Phase wise Treatment provided
Phase 1: Pre-operative Preparation
- Administer local anaesthesia to ensure profound analgesia.
- Achieve strict rubber dam isolation to maintain an aseptic field. (Fig 2)
- Assess preoperative radiographs and confirm working strategy under magnification.
Phase 2: Access Refinement and Identification of Perforation
- Refine the existing access cavity to improve visibility and straight-line access.
- Perform all procedures under a dental operating microscope.
- Carefully debride the pulp chamber to remove debris and remnants of previous treatment.
- Identify the perforation site on the pulpal floor (typically in the furcation region). (Fig 3)
Phase 3: Haemostasis and Site Decontamination
- Irrigate gently using diluted sodium hypochlorite with a 27-gauge side-vented needle.
- Avoid directing irrigant toward the perforation to prevent extrusion into periodontal tissues.
- Achieve haemostasis using sterile paper points (video 1).
- Ensure a clean and relatively dry field prior to material placement.(Fig 4)
Phase 4: Placement of Repair Material (MTA)
- Prepare mineral trioxide aggregate (MTA) to a putty-like consistency.
- Deliver MTA precisely to the perforation site using the appropriate system (video 2).
- Place the material incrementally under magnification.
- Gently compact using micro-pluggers to ensure intimate adaptation to dentinal walls.
- Avoid overfilling or extrusion beyond the defect.
- Verify complete sealing of the perforation visually.
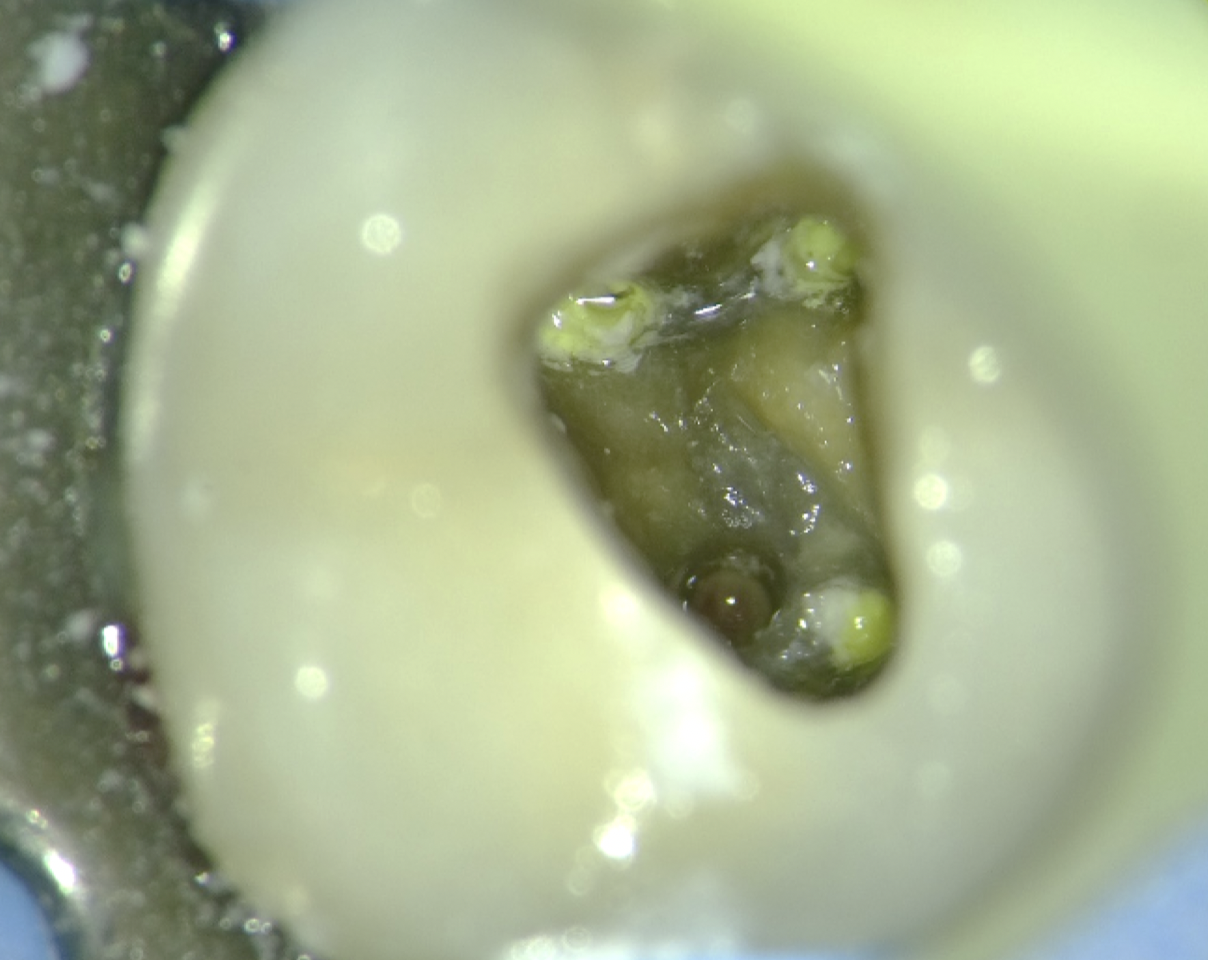
Fig. 3
Phase wise Treatment provided
Phase 5: Setting and Interim Seal
- Place a moist microbrush/cotton pellet over the MTA to facilitate setting.
- Temporarily seal the access cavity.
- Evaluation of MTA set (Fig 5).
Phase 6: Retreatment – Canal Negotiation and Cleaning
- Remove intracanal medicament using rotary files.
- Establish canal patency.
- Determine working length using an electronic apex locator, confirmed radiographically.
- Perform cleaning and shaping using a crown-down rotary technique.
- Preserve original canal anatomy while ensuring adequate enlargement.
- Irrigate with 3% sodium hypochlorite using side-vented needles throughout instrumentation.
- Ensure effective irrigant penetration without apical extrusion.
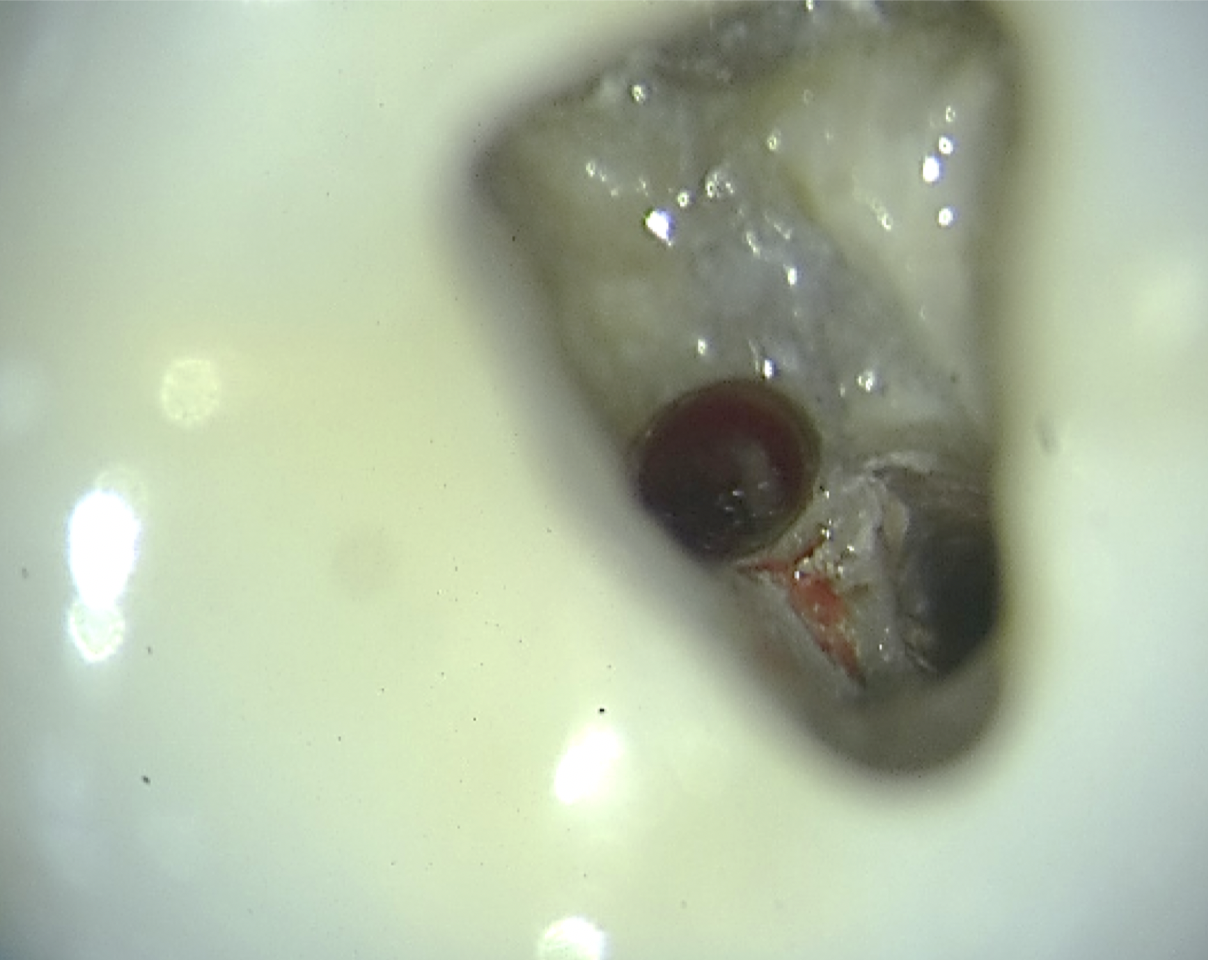
Fig. 4
Phase 7: Obturation
- Select appropriate master cone (matching final preparation size).
- Apply bioceramic sealer within the canal (video 3).
- Perform obturation using the single-cone technique (video 3).
- Ensure homogenous fill and adaptation to canal walls.
- Verify obturation radiographically (Fig 7).
Phase 8: Restorative and Follow-Up
- Place SDR flowable composite incrementally for core build-up.
- Review clinically for resolution of symptoms.
- Radiographic evaluation to assess healing of the furcation area.
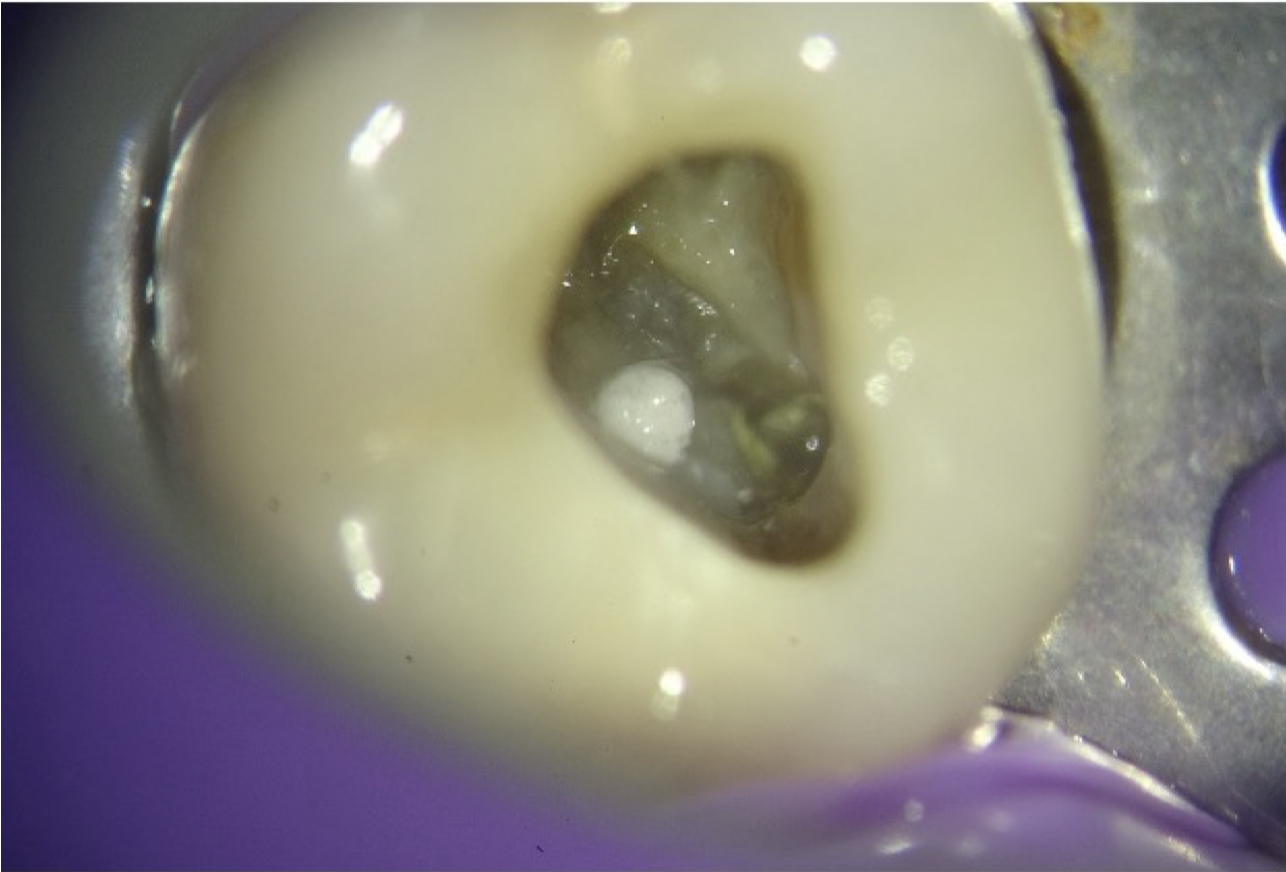
Fig. 5
Clinical picture showing pulpal floor perforation repaired with MTA.
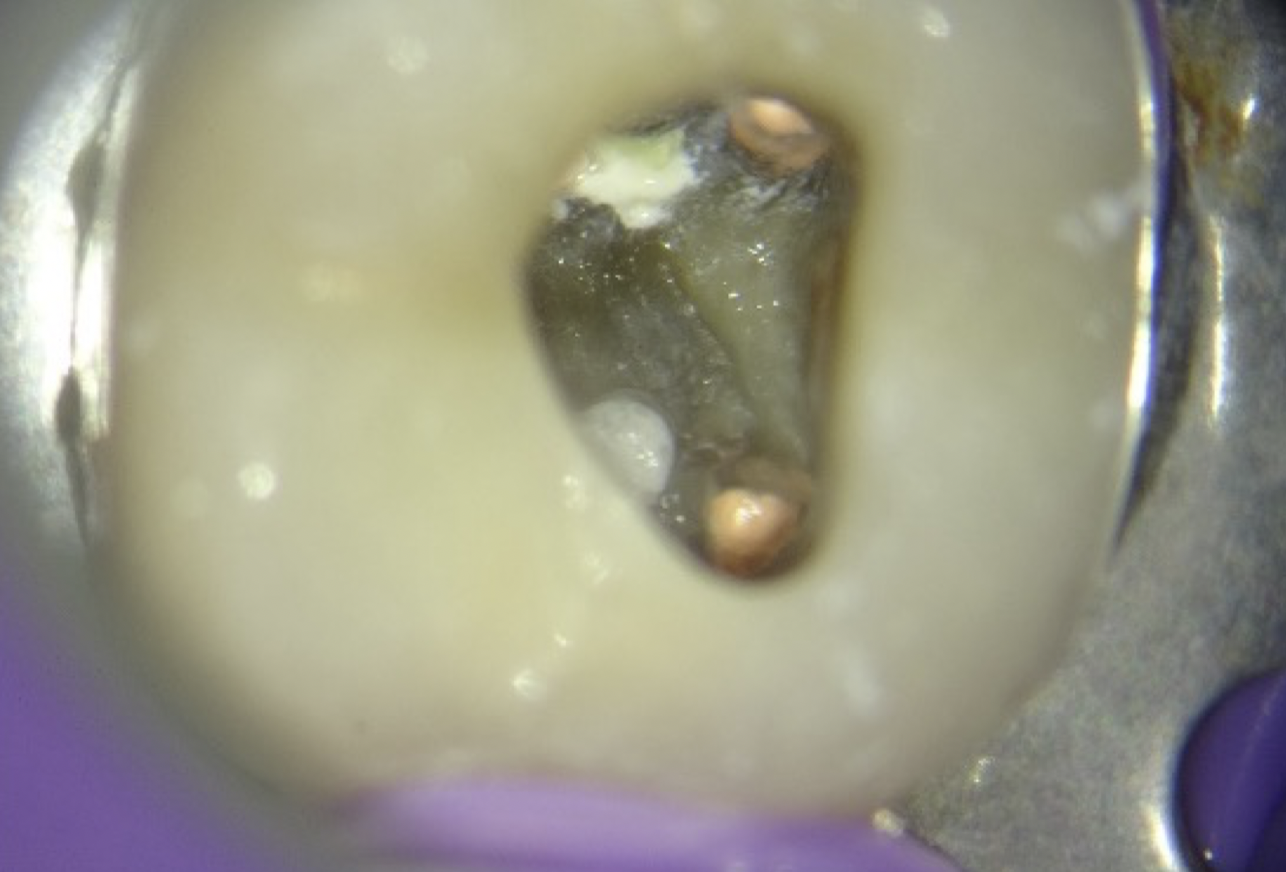
Fig. 6
Clinical picture showing pulpal floor perforation repaired with MTA and canals obturated.
sterile paper point to stop bleeding
Use of appropriate system to place MTA
3D obturation with Bioceramic sealer and GP
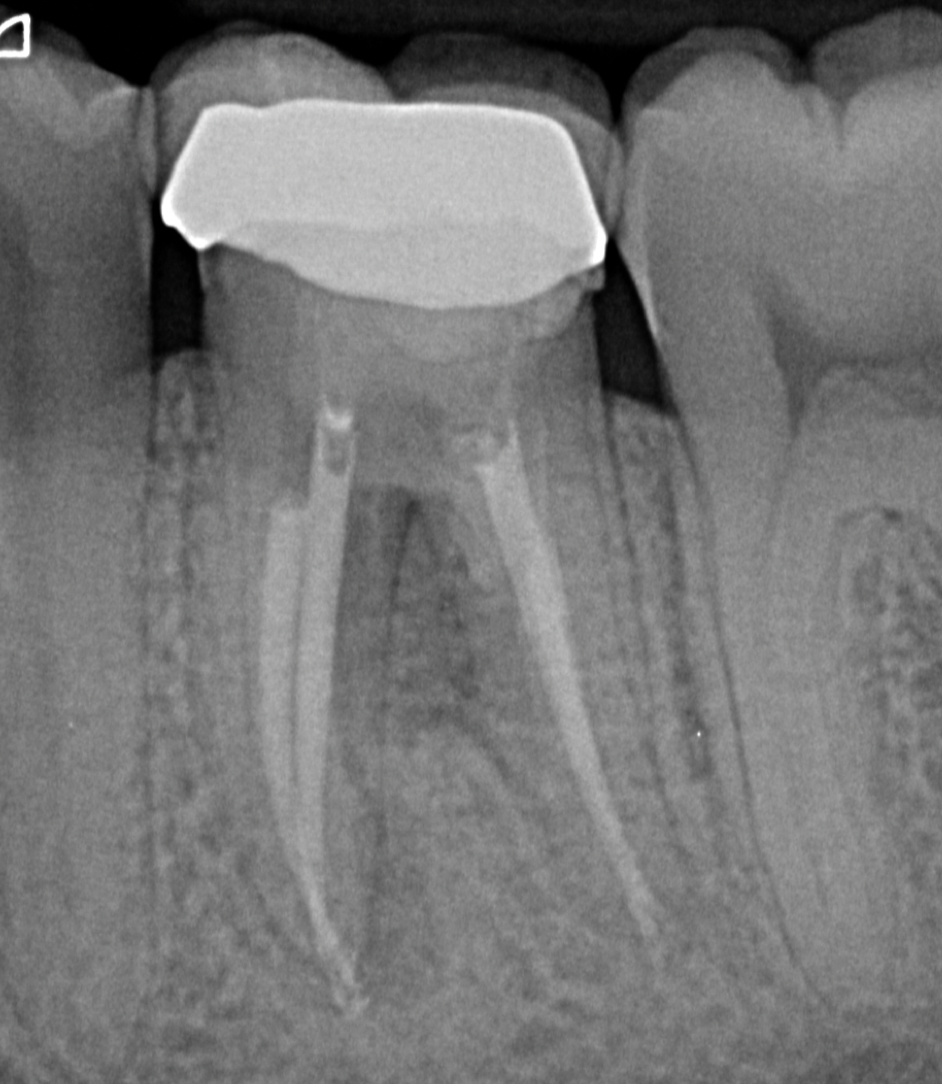
Fig. 7
Radiographic verification of the obturation
Conclusions
The management of iatrogenic perforations has undergone a substantial transformation in contemporary endodontic practice. Clinical situations that were previously associated with uncertain outcomes can now be addressed with a high degree of predictability through a combination of improved diagnostic capabilities and biologically sound treatment strategies.
Successful outcomes are largely dependent on timely recognition of the defect, accurate identification of its location, and meticulous control of the local environment to prevent further contamination. The use of bioactive materials, particularly mineral trioxide aggregate, has played a pivotal role in enhancing repair by providing an effective seal while supporting tissue healing.
Advances in visualisation, especially the routine use of magnification, together with adjunctive imaging such as CBCT when indicated, have significantly improved the clinician’s ability to manage such complications with precision. In addition, modern rotary instrumentation systems enable effective retreatment while maintaining the structural integrity of the tooth. These factors, combined with thorough irrigation protocols and a reliable coronal seal, are essential for achieving long-term success.
This case reinforces the value of a focused and conservative treatment philosophy, where intervention is directed specifically at the underlying cause rather than relying on extensive or unnecessarily invasive procedures. Such an approach not only preserves remaining tooth structure but also enhances the overall prognosis.
In essence, predictable management of perforations is achieved through the thoughtful integration of accurate diagnosis, appropriate material selection, and precise clinical execution. This holistic approach remains fundamental to delivering successful outcomes in complex endodontic cases.
Bibliography
- Seltzer S, Sinai I, August D. Periodontal effects of root perforations before and during endodontic procedures. J Dent Res. 1970;49(2):332–339.
- Fuss Z, Trope M. Root perforations: classification and treatment choices. Endod Dent Traumatol. 1996;12(6):255–264.
- Tsesis I, Fuss Z. Diagnosis and treatment of accidental root perforations. Endod Topics. 2006;13(1):95–107.
- Torabinejad M, Watson TF, Pitt Ford TR. Sealing ability of mineral trioxide aggregate when used as a root-end filling material. J Endod. 1993;19(12):591–595.
- Parirokh M, Torabinejad M. Mineral trioxide aggregate: a comprehensive literature review—Part I: chemical, physical, and antibacterial properties. J Endod. 2010;36(1):16–27.