Management of iatrogenic errors of root canal treatment- A case with multiple complex mishaps, ledge and perforation management
27/06/2024
Abdullah AboHalima
Warning: Undefined variable $post in /home/styleendo/htdocs/styleitaliano-endodontics.org/wp-content/plugins/oxygen/component-framework/components/classes/code-block.class.php(133) : eval()'d code on line 2
Warning: Attempt to read property "ID" on null in /home/styleendo/htdocs/styleitaliano-endodontics.org/wp-content/plugins/oxygen/component-framework/components/classes/code-block.class.php(133) : eval()'d code on line 2
Endodontic treatment can be predictable, successful and relatively easy to perform if every individual step is performed precisely. Mishaps during root canal treatment are considered to be very commonly encountered errors, hence they can unfavorably influence the prognosis of the treatment also they can endanger patient’s health. The causes of mishaps is lack of knowledge of the internal anatomy of the tooth also lack of use of magnification. Performing the root canal treatment in a hurry and carelessly makes it more vulnerable to problems.
In this case the Insufficiently designed access cavities lead to an improper guiding of the instruments by the walls of the cavity with a loss of control of the instruments during root canal preparation leading to ledge.
To overcome the ledge there was multiple trials by the previous dentist to enlarge the cavity to ease the path of the file but unfortunately it led to perforation.
Recognition is the first step in management which includes clinical and radiographic observation.
The next step is correction of the mishap which depends on the type and extent of the procedural accident. The final step requires re-evaluation and assessing the prognosis of the tooth.
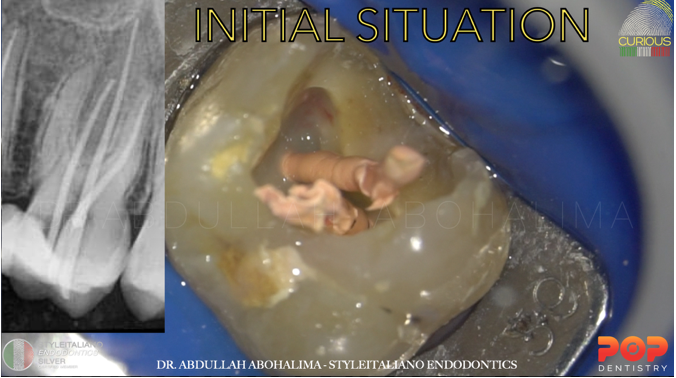
Fig. 1
Pre-op X-rays shows GP inside coronal perforation in the MB canal
The patient was refferred in order to regain the main path of the canal by bypassing the ledge then sealing the perforation
my first step was to remove the GP cones, washing the access cavity to be able to see clearly the perforation site and the original path of the canal.
Severe bleeding from the perforation site.
HOW TO CONTROL ?
1-using anesthesia directly inside the perforation which will act as a hemostatic agent
2-washing the access cavity with sodium hypochlorite without introducing it inside the canal
3-using micro-suction to dry the canal removing any granulation tissues
In case you couldn't control the bleeding put calcium hydroxide end the visit and complete in the next visit to avoid enlarging the perforation or the ledge if you were in a hurry.
(I’m highlighting the importance of good visibility “magnification” and never to rush to be able to see clearly and think properly)
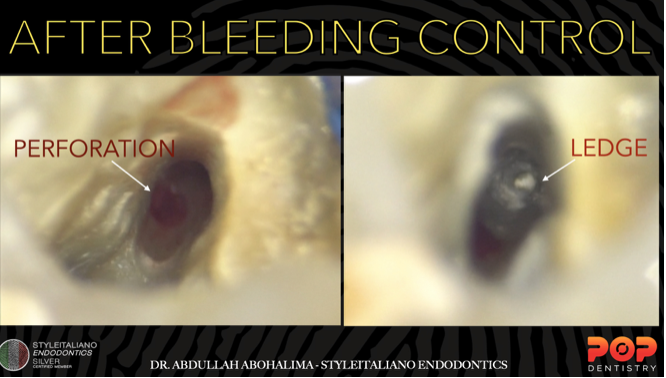
Fig. 2
After controlling the bleeding, I could locate the perforation site which was inside the canal in the coronal part on the inner wall.
The ledge was in the apical part in the outer wall of the canal.
Now it’s time for X-ray to imagine the situation and starting the management planing.
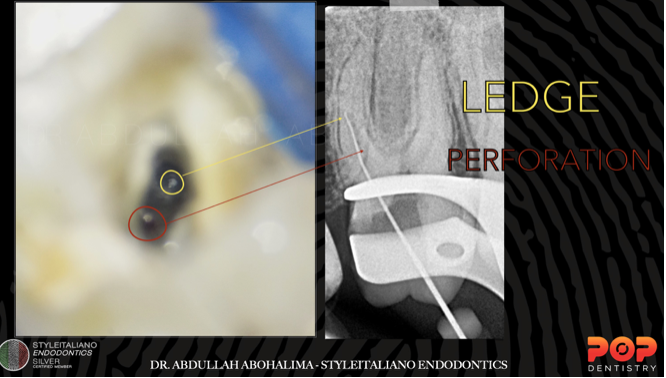
Fig. 3
X-ray shows position of the ledge.
First thing to notice that the main path of the canal would be above the ledge on the inner wall, So don’t search apically as that’s the ledge site.
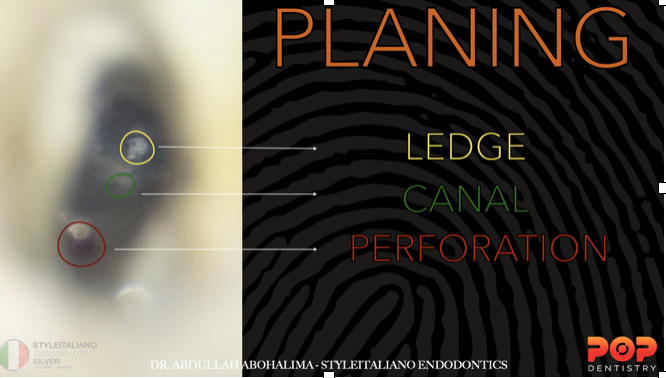
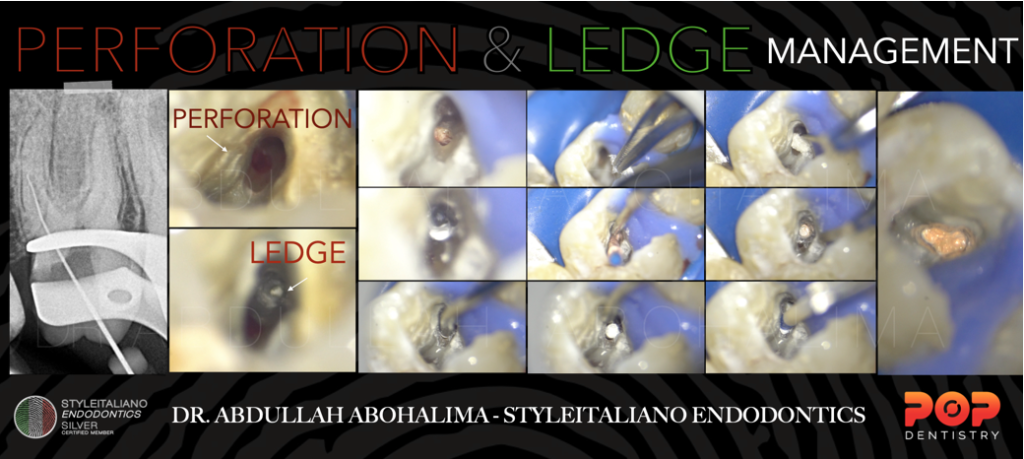
Fig. 4
Close up image shows the perforation site, ledge site and the possible canal location that I will search in.
Perforation coronaly in the inner wall, ledge apically in the outer wall
The following animation would help us to understand more and start the clinical plan:
-First using US on the outer wall for coronal flaring to provide more space for my files to negotiate in the inner wall
-2nd using small US tip for troughing inside the canal in the inner wall to be able to see the canal entrance
-After that using a pre-curved manual file and try to find a catch of the orifice
let’s watch the previous steps clinically!
1-coronal flaring from the outer wall
2-troughing in the inner wall
3-pre-curved manual file to find the main path of the canal
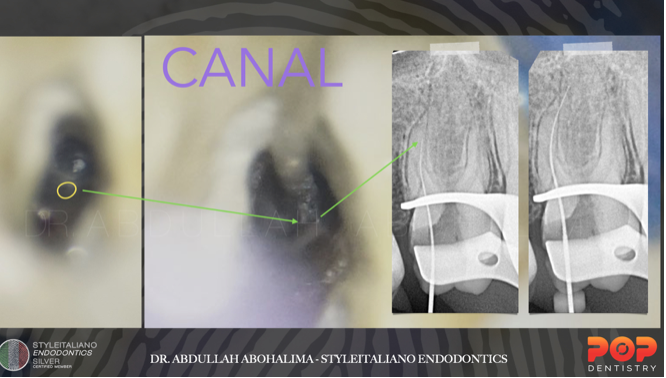
Fig. 5
X-ray to confirm that the file in the right path then complete the negotiation with gentle watch winding motion to reach the full WL
The yellow circle shows the canal entrance as planned before.
shaping, the challenge was to insert the rotary file in the main canal because of the difficult accessibility.
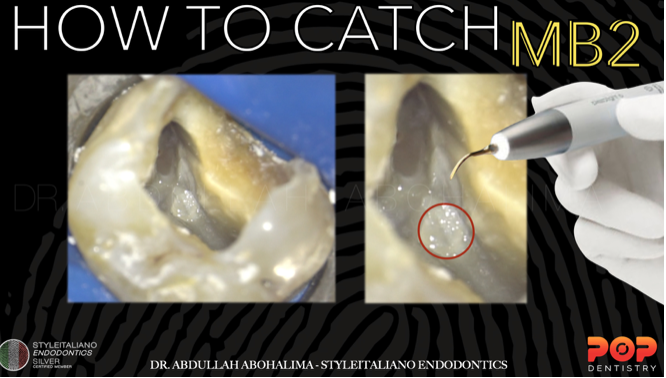
Fig. 6
After complete shaping of the main canals, it’s time for searching for MB2 canal
You don’t only need to remove the attached pulp stone but you also have to do sub-pulpal level troughing in mesio-palatal direction.
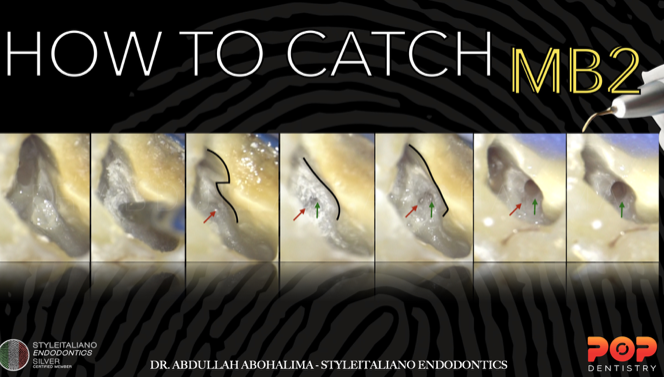
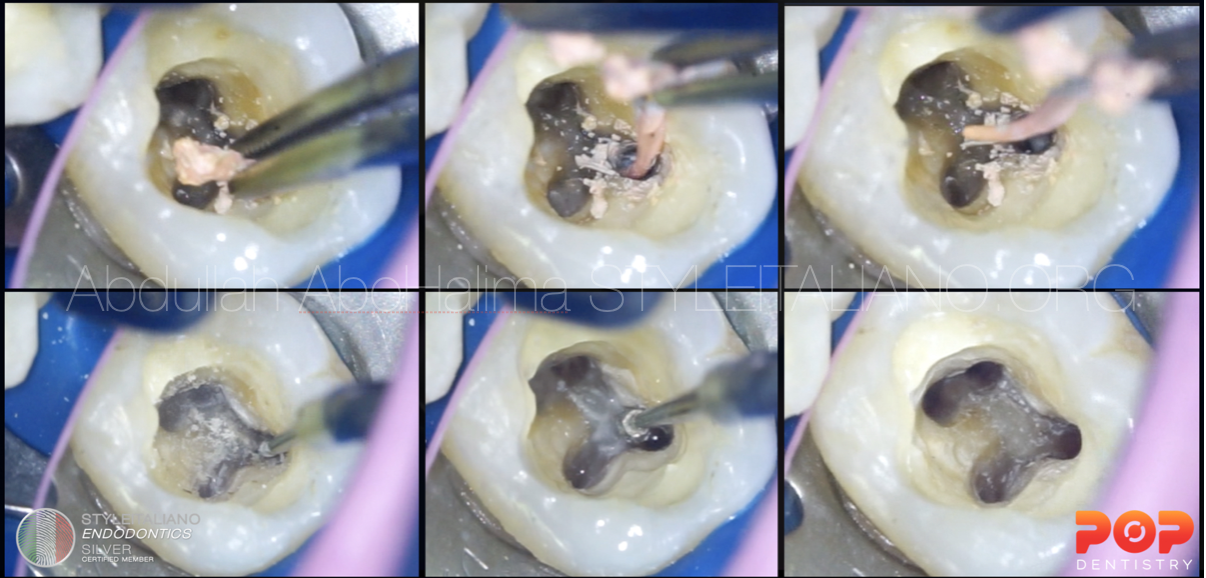
Fig. 7
This image shows the correct position of the main entrance of the MB2 canal
-we can see two direction of the entrance-take care of the false entrance it might end up with perforation or ledge.
Yo have to do more troughing like in the 4th pic
The right entrance is shown in the junction between the wall and floor.
After shaping the MB2, taking the master cone X-ray
All the canals are ready for the obturation
The important part is obturation of the MB canal using Sandwich technique
Fill the canal by doing down pack beyond the perforation level after that seal the perforation with MTA then back filling with thermoplasticised gutta-percha.
MTA placement in the perforation site then obturation for all the other canals and immediate coronal seal.
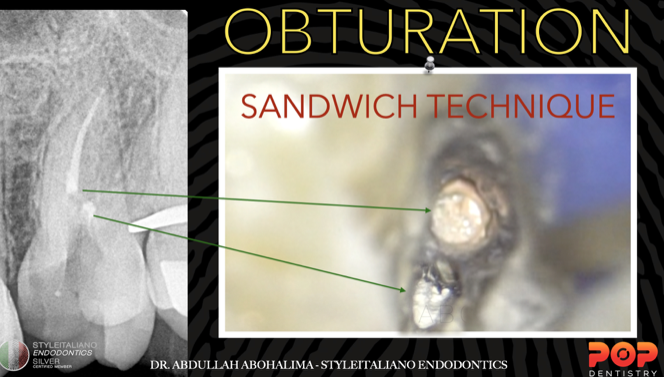
Fig. 8
-GP apical “Canal”
-MTA perforation
-GP coronal “Canal”
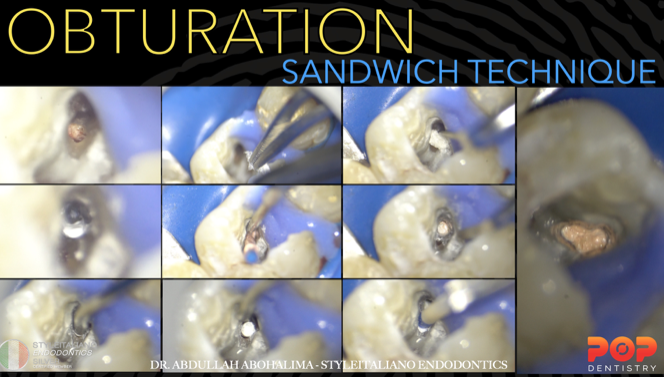
Fig. 9
Step bt step using collagen matrix to act as external barrier to avoid any MTA extrusion
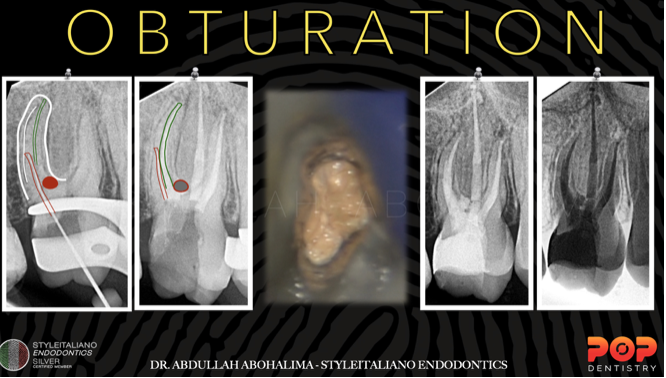
Fig. 10
Post-op X-ryas shows perfect seal apically, coronally and in the perforation site with multiple lateral canals.
Conclusions
An accurate assessment of the clinical and imaging diagnosis, comprehensive knowledge of the anatomy of the tooth and concerning the instruments being used, as well as consistently relying on the operating microscope can provide significant means in order to avoid a troublesome experience and perform the best endodontic treatment possible .Those who perform root canal therapy must have a basic knowledge of methods of prevention as well as recognition, management and prognosis of endodontic mishaps.
Bibliography
- Gluskin AH. Mishaps and serious complications in endodontic obturation. Endodontic topics. 2005 Nov;12(1):52-70.
2. Torabinejad M. Endodontic mishaps: etiology, prevention, and management. The Alpha omegan. 1990;83(4):42.
3.Clauder T, Shin S-J. Repair of perforations with MTA: clinical applications and mechanisms of action. Endodontic Topics 2006;15:32–55.
4.Management of ledge formation in root canal treatment . Aravind.N, Pradeep.S. International Journal of Current Advanced Research. 2017
5.CohenS, Burns RC. Pathways of the pulp. 8th ed. St Louis: Mosby, 2002
6.Jafarzadeh H, Abbott PV. Ledge formation: review of a great challenge in endodon- tics. J Endod 2007;33:1155–62.
7.Green KJ, Krell KV. Cilinical factors associated with ledged canals in maxillary and mandibular molars.Oral Surg Oral Med Oral Pathol 1990; 70: 490-7.
8.Fabio G. Gorni, DDS Andrei C. Ionescu, DDS, PhD, Federico Ambrogi, MSc, PhD Eugenio Brambilla, DDS Massimo M. Gagliani, MD, DDS Prognostic Factors and Primary Healing on Root Perforation Repaired with MTA: A 14-year Longitudinal Study DOI:https://doi.org/10.1016/j.joen.2022.06.005