Vital pulp therapy
30/08/2023
Fellow
Warning: Undefined variable $post in /home/styleendo/htdocs/styleitaliano-endodontics.org/wp-content/plugins/oxygen/component-framework/components/classes/code-block.class.php(133) : eval()'d code on line 2
Warning: Attempt to read property "ID" on null in /home/styleendo/htdocs/styleitaliano-endodontics.org/wp-content/plugins/oxygen/component-framework/components/classes/code-block.class.php(133) : eval()'d code on line 2
Endodontic treatment is the most common procedures that performed in daily clinic routine the aim of endodontic therapy is to treat the infectious situation caused by bacteria from carious lesion which reached to the pulp chamber causing necrosis and lesion formation. Since pulp is the most important part of the tooth, in this article we will discuss the procedure of preserving the pulp vitality and how to do it in an optimal way.
Dental pulp is the sof tissue located in the Pulp chamber, in the center of the tooth, which consist of the blood vessels, nerves and connective tissue; pulp plays a vital rule in tooth development, sensation and nutrition. Throughout life the tooth pulp may suffer from a lot of situations such as trauma, attrition and caries: if the damage reached the pulp chamber, these situations will affect the vitality of the pulp, leading to pulp necrosis.
Before this happens we can try to do some steps to preserve the vitality of the pulp by doing a VITAL PULP THERAPY: this procedure aims to treat the initial tooth situation conservatively, by removing the harm and place bio materials that helps preserving the vitality of the pulp such as MTA, BIOCERAMICS and CaOH. This procedure cane be divided into:
1- INDIRECT PULP CAPPING: when after caries removal we reach the pulp chamber without pulp exposure, we use a bio material as a base under the filling in order to let the pulp heal itself by adding additive dentin layers.
2-DIRECT PULP CAPPING: when after caries removal we experience a pin point exposure of the pulp tissue, we cover this exposure by a MTA, bioceramics or calcium hydroxide to prevent pulp infection/ necrosis and to induce the pulp to place tertiary dentin to close the site of exposure.
3-PULPOTOMY: When pulp exposure is massive, this procedure consists in removing the coronal pulp (infected pulp) of the tooth and, after having controlled the bleeding, place biomaterial on it in order to preserve radicular pulp vitality and induce dentin bridge formation.
The Procedure:
The procedure for vital pulp therapy typically involves the following steps:
1. Assessment: The case that selected for vital pulp therapy should pass throughout multiple tests clinically and radiographically to diagnose the situation
2. Pulpotomy: If the tooth suffering from large carious lesion that almost reached the pulp chamber or exposed it, a procedure of gently removing the infected coronal pulp is performed and a biocompatible materials placed over the cutted tissue after bleeding control.
3. Pulp-capping: In some cases the caries is deep but there is no entrance to the chamber or there may be a pin point exposure in it with a controllable by bleeding in this cases we can put the biocompatable materials directly over the exposure site and cover it with restoraion in order to promote healing.
4. Restoration: Once the vital pulp therapy is completed, the tooth is restored using appropriate dental materials, such as dental fillings, inlays, or onlays. The choice of restoration depends on the extent of tooth damage and the functional requirements.
Benefits of Vital Pulp Therapy:
1. Preservation of natural tooth: Vital pulp therapy aims to save the natural tooth structure, avoiding the need for more invasive treatments like root canal therapy or extraction.
2. Retention of dental functionality: By preserving the natural tooth, vital pulp therapy helps maintaining proper chewing function and prevents the need for tooth replacements like dental implants or bridges.
3. Cost-effective approach: Vital pulp therapy is generally less expensive than extensive root canal treatments or tooth extractions followed by prosthetic replacements.
4. Faster recovery and reduced discomfort: Compared to more invasive treatments, vital pulp therapy often results in faster healing and reduced post-operative discomfort for the patient.
Limitations and Considerations:
While vital pulp therapy offers numerous benefits, it may not be suitable for every dental condition. The success of this procedure depends on various factors, including the extent of pulp damage, the presence of infection, the patient’s age, and overall oral health. Dentists evaluate each case individually to determine the most appropriate treatment plan
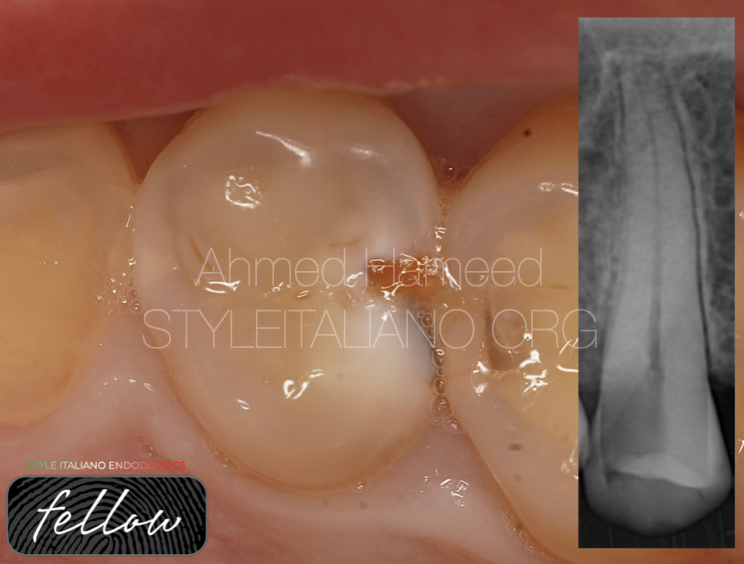
Fig. 1
The first step in vital pulp therapy is to evaluate the situation first of all taking the history from patient(what,when and how) the patient should describe the situation precisely specially the severity of pain.
The patient should not refer spontaneous pain to the tooth, the tooth should response normally to thermal test, there should no be any swelling, tenderness or sinus tract present, on radiograph there should not be evidence of caries entering into the pulp chamber and no signs of necrosis.
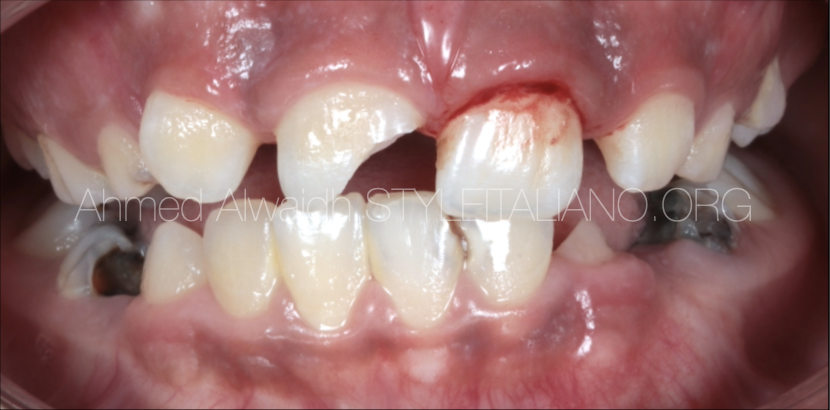
In this case the patient referred severe pain on cold, but after multiple tests there was no swelling or tenderness and the tooth responded normally to thermal test.
The radiograph shows a big carious lesion extended to the pulp chamber but all the other things are normal in the apical area.
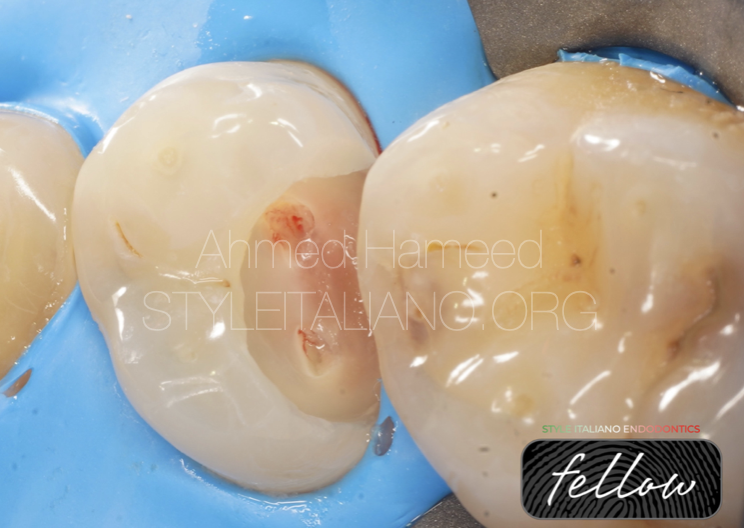
Fig. 2
After caries removal there was to points of exposures: here the clinician can choose between direct pulp capping or vital pulp therapy. I picked the vital pulp therapy here because the exposures were large and I wanted to minimize the amount of infected pulp presents, so I decided to cut the coronal pulp and continue with VPT.
You can see here that the pulp is pink and still attached with present of some blood vessels that give the impression of the pulp is still vital.
No severe bleeding noticed after the exposure.
Notice: the caries removal should be done under rubber dam to reduce the chances of getting infection from saliva or mouth.
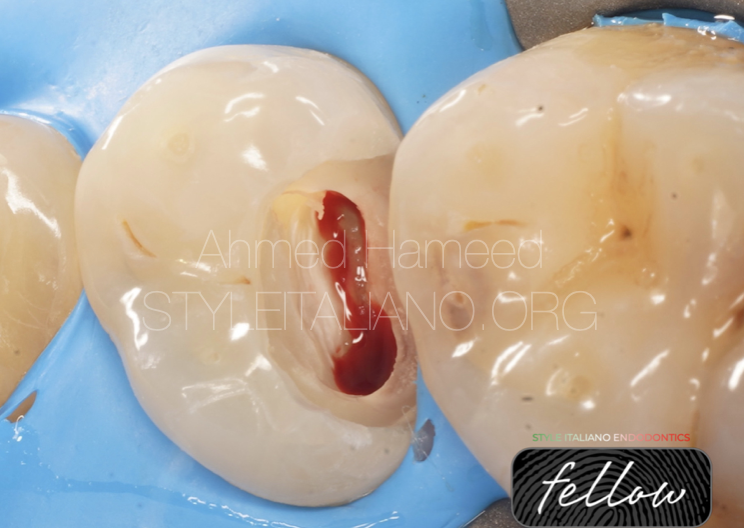
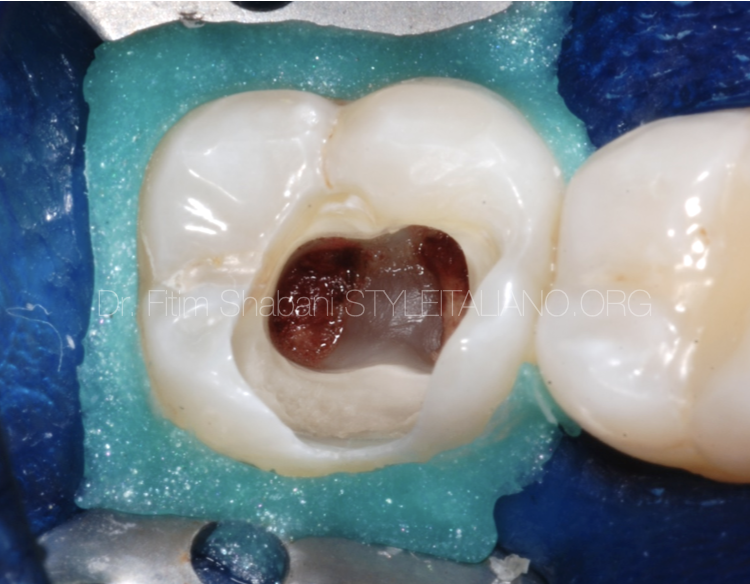
Fig. 3
After exposing pulp by removing chamber roof we can see here that pulp looks healthy pink with controllable bleeding which my be induced by bur while removing the roof causing a pulp injury.
Note: all the steps after caries removal should be done with sterile tools even burs should be changed not the same bur used for caries removal.
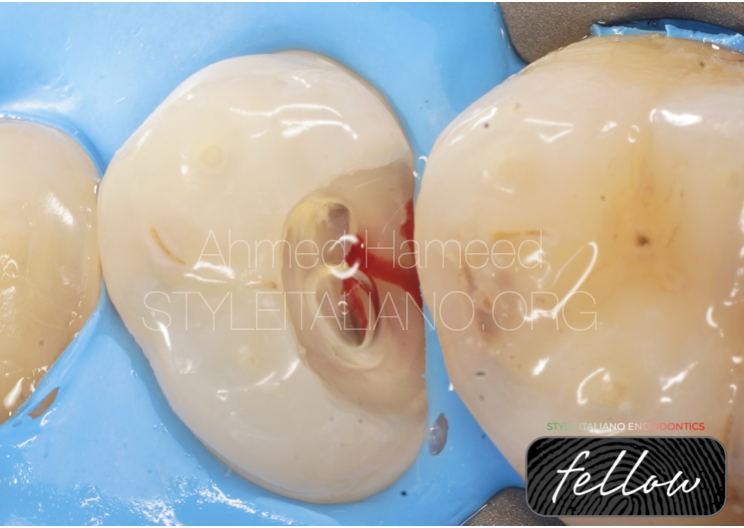
Fig. 4
Here I did cut the coronal pulp using Endo-Z bur or you can use any sterile tool that give you a good cut without damaging the radicular rest of the pulp.
See the bleeding still few and controllable.
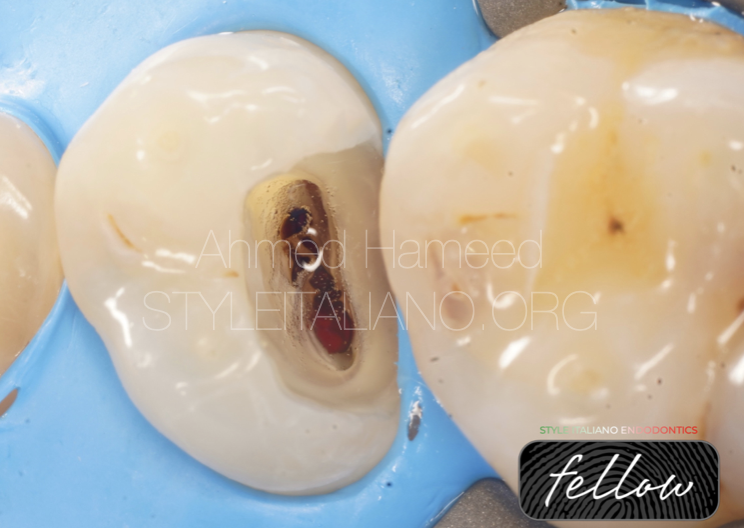
Fig. 5
In this step I used 5% NaOCl to for 3 mins to get a blood clot and disinfection.
You can see the clots already formed in the NaOCl without blood flushing that interfere with its formation.
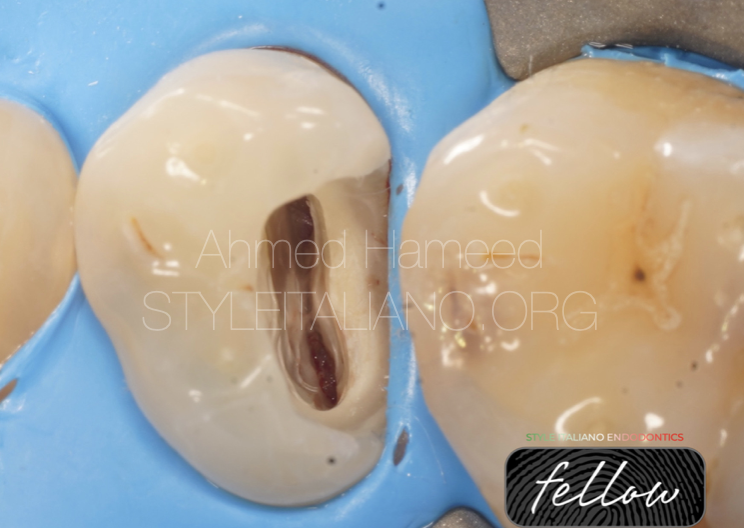
Fig. 6
After bleeding control with NaOCl I used normal saline to flush and rinse the chamber.
The pulp looks healthy, attached and normal after drying: at this point we can cover this tissue with some biocompatible material to induce it to form a dentin bridge and save its vitality.
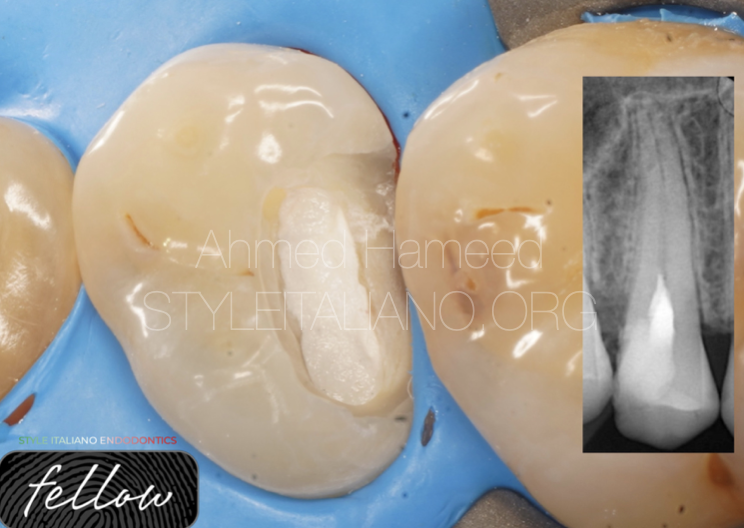
Fig. 7
This is the final picture with bioceramic putty covering the pulp tissue.
Note:we should be sure that we cover the entire pulp tissue inorder to leave no chance for leakage after this step.
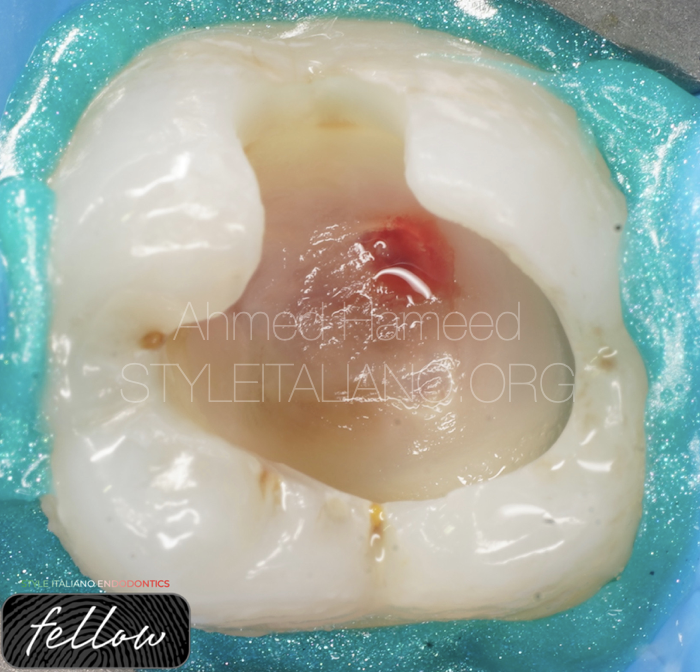
Fig. 8
In this case, the patient came with sever pain (as he described it) even he can’t sleep at night. This should be considered as a sign for irreversible pulpitis ,but after examination there were no tenderness, no pocket, no swelling and the tooth responded normally to thermal tests.
After caries removal there were three sites of exposure, so I decided to go with vital pulp therapy here (pulpotomy) instead of direct pulp capping to get better chances in removing infected pulp that may be affected by bacteria drained from the sites of exposure, there was slight bleeding from the exposures with a pink attached pulp tissue.
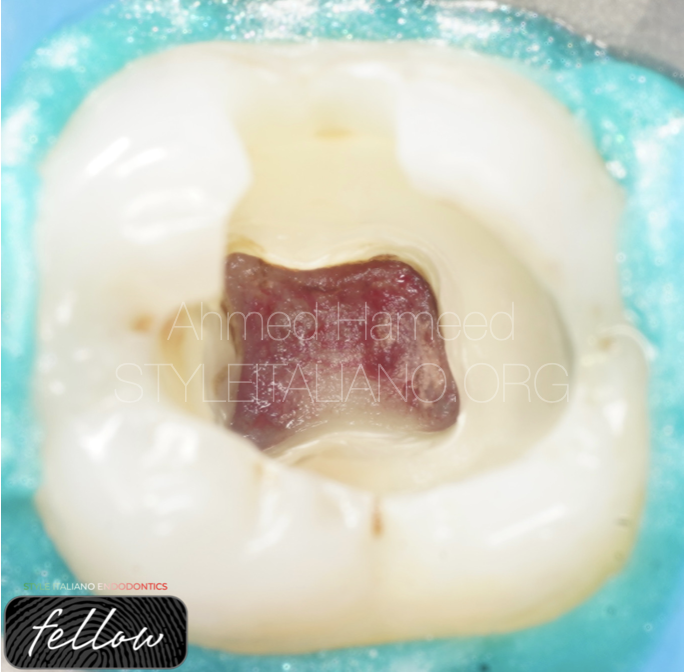
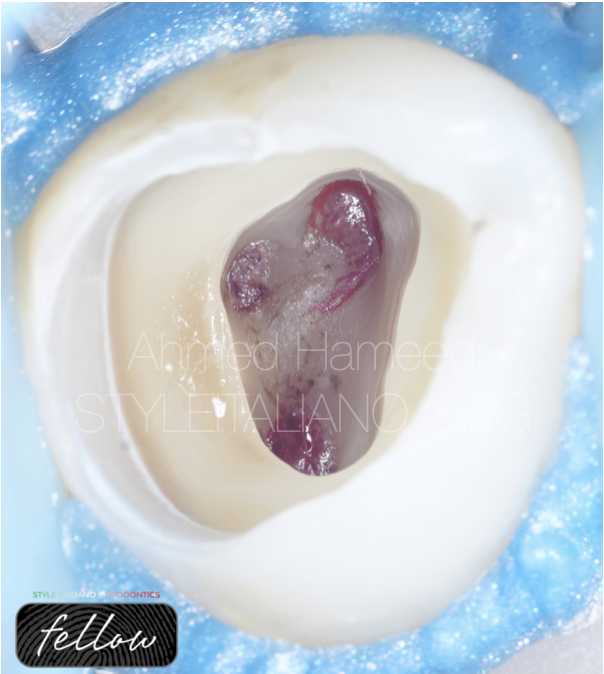
Fig. 9
You can see here after chamber roof removal that the pulp tissue looks healthy.
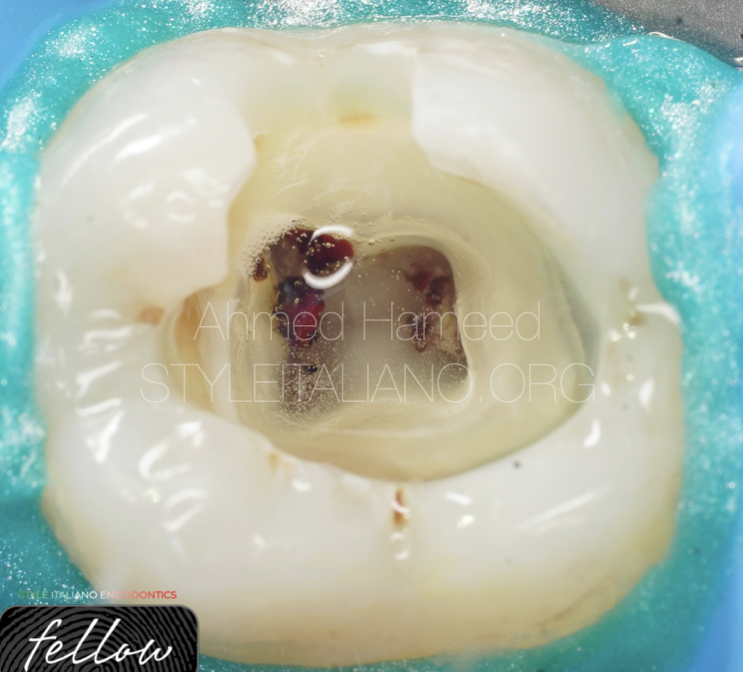
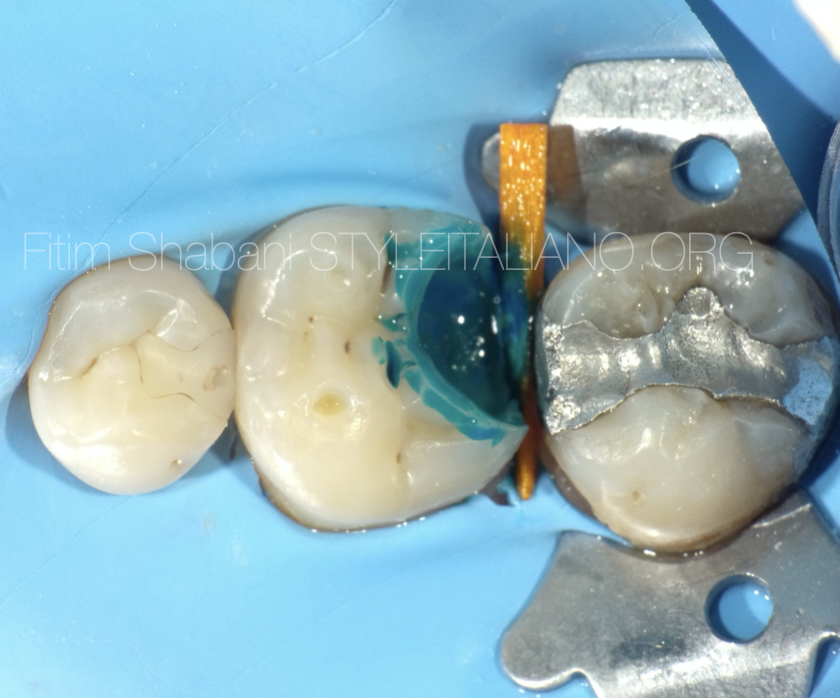
Fig. 10
Removal of the coronal pulp with endo-z bur and placing NaOCl for bleeding control.
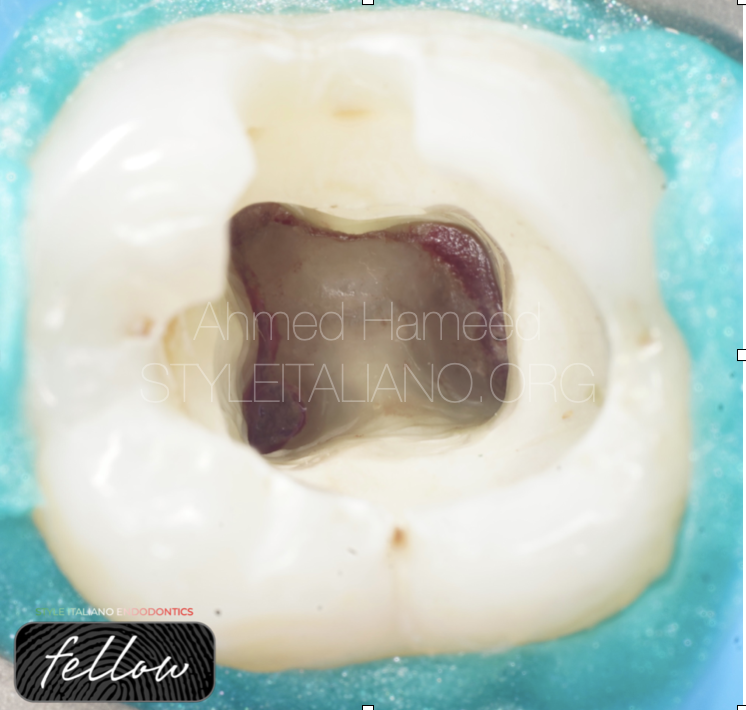
Fig. 11
Rinsing with normal saline and dry with sterile cotton, looks a healthy tissue now its time to cover with biomaterials.
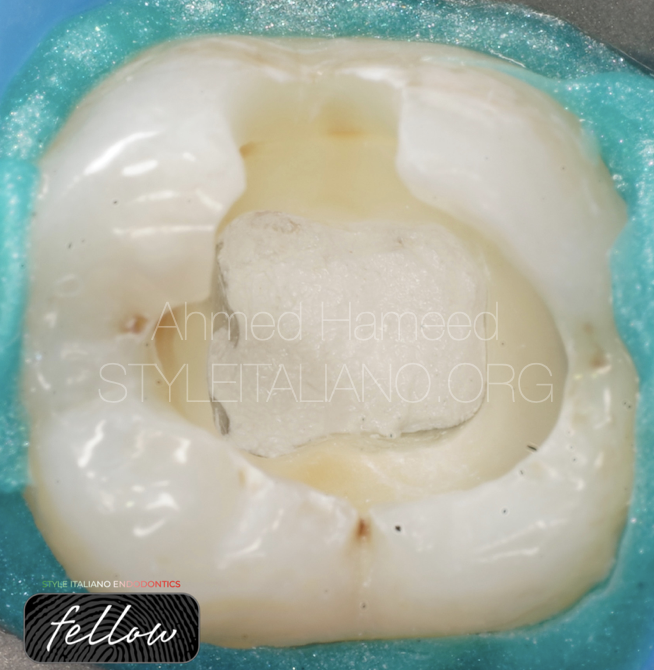
Fig. 12
The entire chamber covered with bioceramic putty.
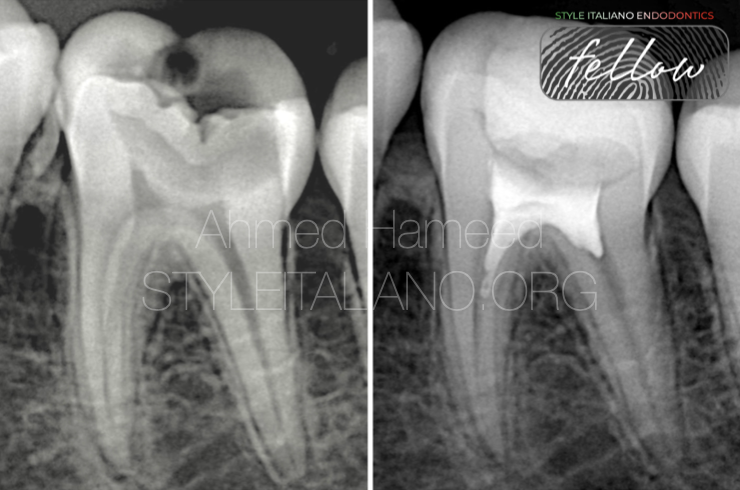
Fig. 13
Radiographic image shows that there is still some roof the protecting the pulp tissue underneath it, with receded distal pulp horn that reveals a defence mechanism of the pulp against the irritation caused by carious lesion.
Fig. 14
About the author:
Conclusions
Vital pulp therapy shows great results in preserving pulp function and vitality in teeth affected by severe injury or decays.
A careful pre operative evaluation of the case and the adherence to strict protocols, together with the use of biocompatible materials, can allow the dentist to preserve the vitality of pulp with a minimally invasive procedure.
Bibliography
1. Aguilar P, Linsuwanont P. Vital pulp therapy in vital permanent teeth with cariously exposed pulp: a systematic review. J Endod. 2011;37(5):581-587. doi:10.1016/j.joen.2011.01.008
2. American Academy of Pediatric Dentistry. Guideline on Pulp Therapy for Primary and Immature Permanent Teeth. Revised 2017. Accessed July 13, 2023. https://www.aapd.org/globalassets/media/policies_guidelines/g_pulptherapy.pdf
3. Barcelos R, Santos MC, Primo LG, et al. Pulpotomy in primary molars: systematic review and meta-analysis. Int J Paediatr Dent. 2018;28(1):23-31. doi:10.1111/ipd.12307
4. Galler KM, Widbiller M, Buchalla W, Eidt A, Hiller KA, Hoffer PC. EDTA conditioning of dentine promotes adhesion, migration and differentiation of dental pulp stem cells. Int Endod J. 2016;49(6):581-590. doi:10.1111/iej.12468
5. Mente J, Hufnagel S, Leo M, et al. Treatment outcome of mineral trioxide aggregate in open apex teeth. J Endod. 2013;39(1):20-26. doi:10.1016/j.joen.2012.09.004
6. Parirokh M, Torabinejad M. Mineral trioxide aggregate: a comprehensive literature review–Part I: chemical, physical, and antibacterial properties. J Endod. 2010;36(1):16-27. doi:10.1016/j.joen.2009.09.006