How to manage ledges using rotary files
22/09/2020
Filippo Cardinali
Warning: Undefined variable $post in /home/styleendo/htdocs/styleitaliano-endodontics.org/wp-content/plugins/oxygen/component-framework/components/classes/code-block.class.php(133) : eval()'d code on line 2
Warning: Attempt to read property "ID" on null in /home/styleendo/htdocs/styleitaliano-endodontics.org/wp-content/plugins/oxygen/component-framework/components/classes/code-block.class.php(133) : eval()'d code on line 2
Ledge creation is one of the most common iatrogenic damages during the shaping.
As Clinicians we do prevent ledge creation using a “sweet” approach to the Endodontic anatomy during the shaping, but we also know how to manage the ledge when it is present, as there is a strong and scientific recognized relationship between presence of the ledge and negative outcome of the endodontic treatment. Aim of this article is to share with the community a rational and easy approach to manage the ledge using rotary files.
A ledge is a deviation from the original pathway of the canal created by the clinician during the instrumentation. Two factor are needed to create a ledge: the first is the presence of a curved canal, the second is an inappropriate approach during the instrumentation by the clinician.
Once the ledge is created, if the clinician continues to force the manual/rotary file, a perforation could be created. The ledge impedes access of instruments to the apex, thus canal blockage is caused by packing dentin chips and/or tissue debris: as a result, the portion of canal located apically to the ledge it is not shaped, cleaned and filled, and this is the reason why it is well recognized by the scientific community that there is a strong relationship between ledge creation and negative outcome of the therapy. According to the Literature we well know that working through contracted access cavities, forcing file/rotary file in curved canals and an improper WL registration are all factors that could lead to a ledge formation. Knowing the etiology of the ledge is really helpful to prevent its creation and during the treatment of curved canals helps us paying attention to all these factors.
Howewer it’s also important to know how to manage a ledge: in this article I will share with you some considerations and some clinical tips to properly manage a ledge, according with the Styleitaliano Endodontics philosophy.
To properly manage a ledge we do take into account these points:
- The ledge is always in the external wall of a curved canal
- It’s really important to know how deep is the ledge and the WL in order to choose the best operative strategy to complete properly the endodontic treatment
- Prebendig a manual file is still a very important stage to manage a ledge
- Martensitic rotary files at body temperature are very helpful to quickly and safely manage a ledge
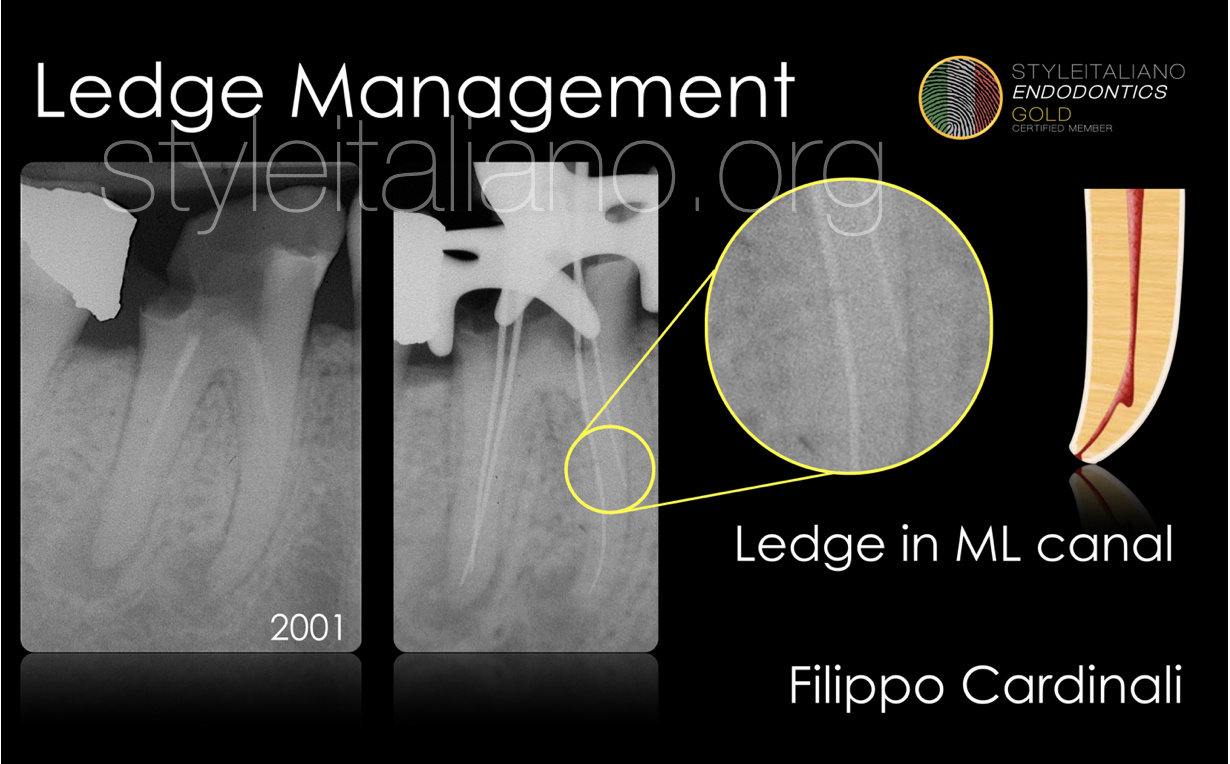
Fig. 1
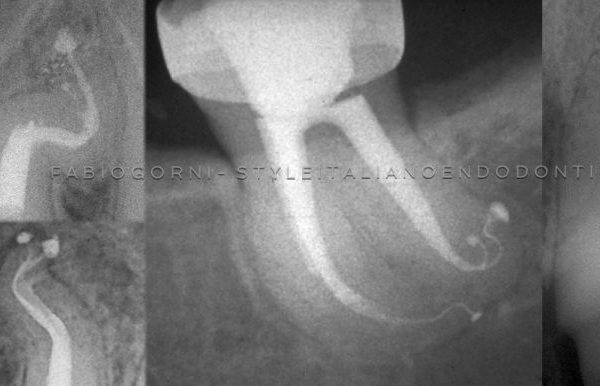
Single-Visit Retreatment of tooth 4.6 with L.E.O.
In this mandibular molar a ledge was created during the previous treatment in the mesio-lingual canal.
A small K file .08 was prebent and inserted with the tip touching the inner wall of the canal, in order to overcome the ledge that is in the opposite wall of the canal.
The shaping was carried out using the Step-Down technique with manual K file and Gates Glidden.
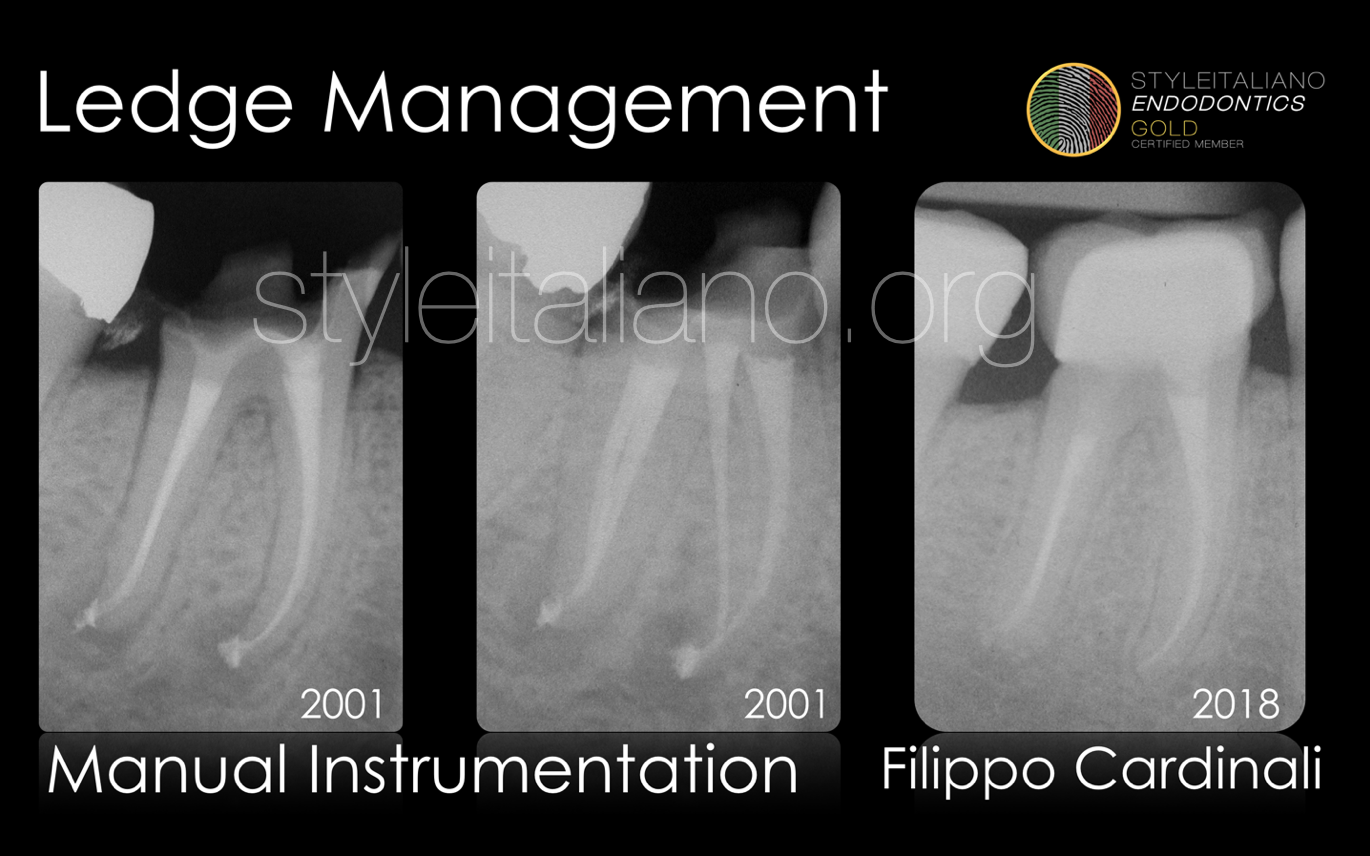
Fig. 2
Once completed the shaping with k files, the tooth was obturated with ZOE sealer (Pulp Canal Sealer, Kerr) and gutta-percha using the Warm Vertical Compaction.
After the crown-lengthening, the build-up and a full coverage with a crown was carried out.
Positive outcome of the treatment after 17 years.
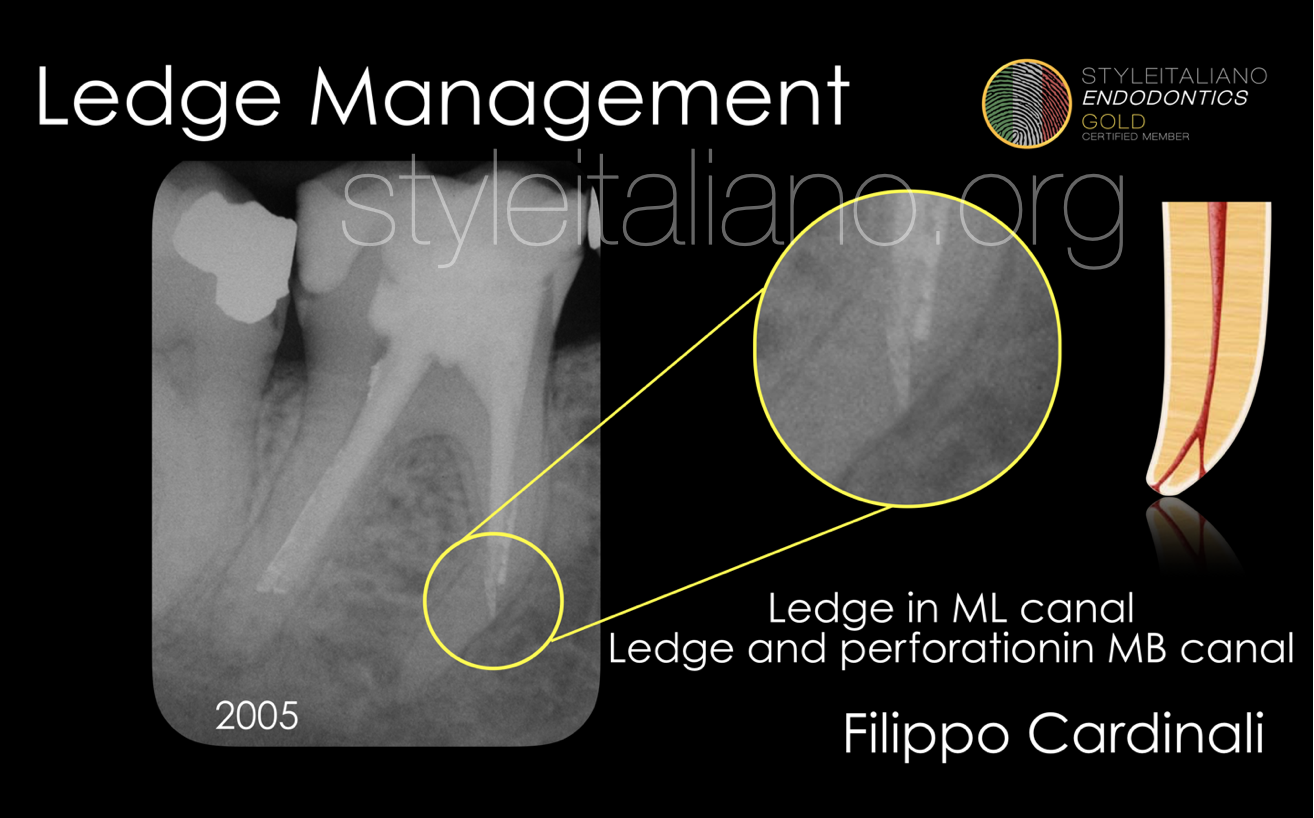
Fig. 3
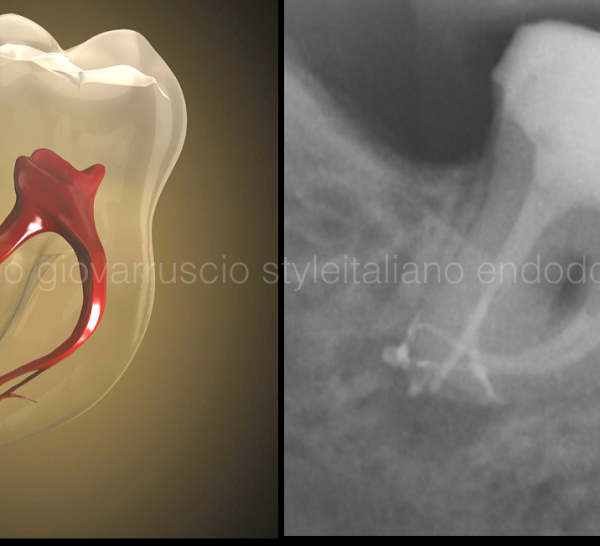
Single-Visit Retreatment of tooth 4.6
In this mandibular molar a ledge was created during the previous treatment in the mesio-lingual canal. In the mesio-buccal canal after the creation of the ledge, a perforation was created.
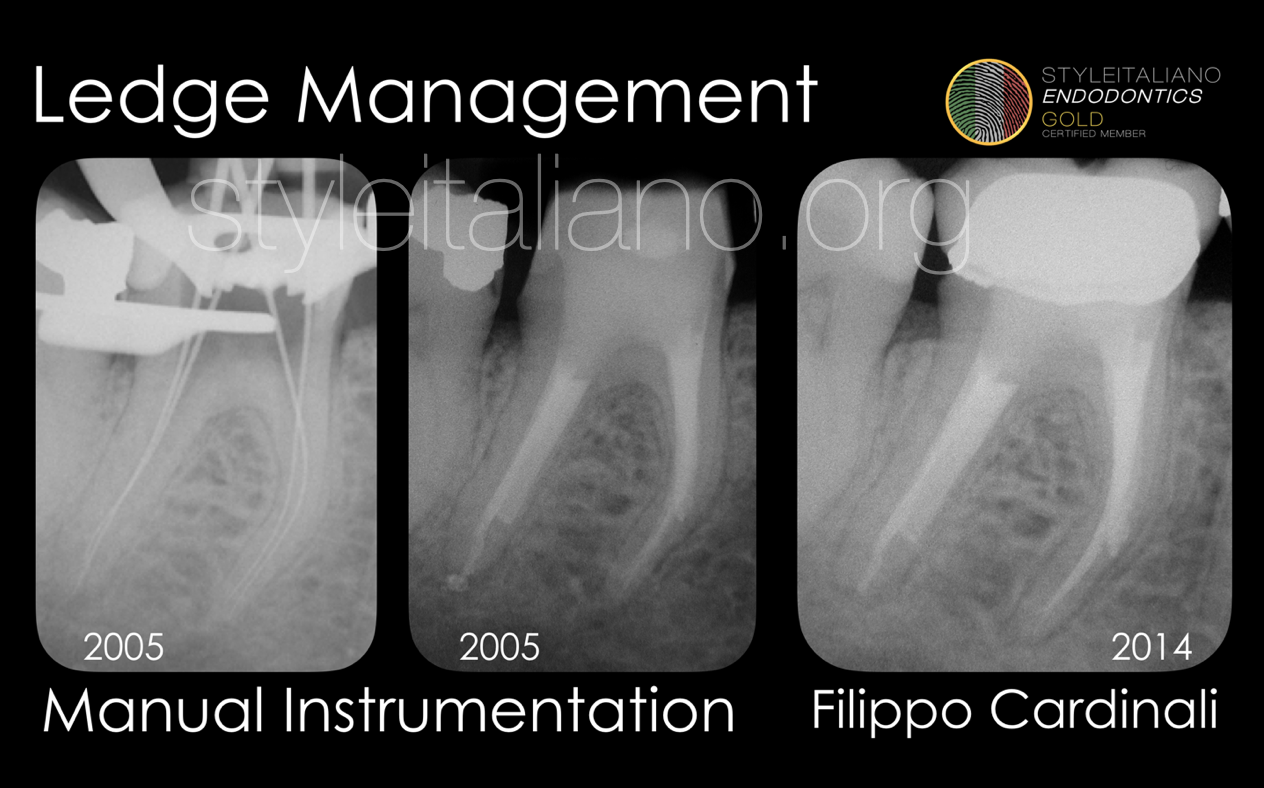
Fig. 4
Case 2
Single-Visit Retreatment of tooth 4.6
A small K file 08 was prebent and inserted with the tip touching the inner wall of the canal, in order to overcome the ledge that is in the opposite wall of the canal.
The shaping was carried out using the Step-Down technique with manual K file and Gates Glidden.
Once completed the shaping with k files, the tooth was obturated with ZOE sealer (Pulp Canal Sealer, Kerr) and gutta-percha using the Warm Vertical Compaction.
Outcome of the therapy after 9 years.
Ledge management using rotary files: the technique
Nowaday it is possible to manage a ledge in the middle and coronal third of the root in a quick a safe way using rotary file that are martensitic at body temperature.
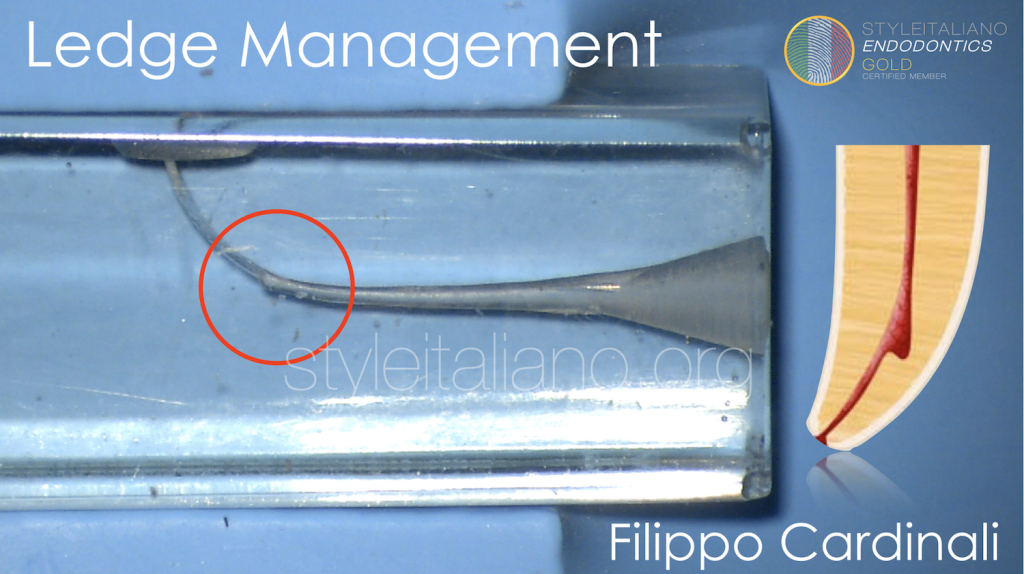
In this plastic block and in the following cases a martensitic at body temperature rotary file 25.06 (One Curve - Coltene MicroMega) was used for the shaping of the canal and the ledge management.
To safely apply this technique we have to verify that the diameter of the original canal at ledge level is more than 25: in that way it is possible to engage the tip of the file in the original canal apically at the ledge.
So basically the technique is divided in 2 stages: in the first stage with manual files the clinician overcome the ledge and create a safe space for the second stage where the rotary file is used to quickly complete the shaping
The first 2 things to asses are the depth of the ledge and the working length.
- The depth od the ledge it’s really easy to determine by inserting a straight stainless steel file inside the canal
- The working length can be easily determinate using an apex locator connected to a small k file prebended to overcome the ledge
Ledge management using rotary files: the technique
1st stage
It is important to bring at the WL a K file 15, as it is well recognized as a space #15 0.2 space is very useful to reduce the stress on rotary files.
Once the file #15 is arrived at the WL, thanks to the knowledge of the depth of the ledge it is possibile to understand without any kind of doubt the minimum diameter possible of the original canal at ledge level.
In the plastic block the ledge is at 4 mm from the WL; when a manual file #15 .02% taper is at the working length, the diameter of the file at ledge level is 21, so it’s not safe and possible to engage the tip of the rotary file that is 25.
It’s more than enough to arrive at the WL with a manual file #20, that makes that the canal path at ledge level is bigger than 25.
Ledge management using rotary files: the technique
2nd stage
Now it is possible bend the tip of a martensitic rotary file and to insert the rotary file with the tip touching the inner wall of the canal in order to overcome the ledge and in order to place the tip in the canal space apically to the ledge.
Once the file is in the right position it is possible to activate the rotation to complete the shaping in a couple of strokes.
This technique works only using rotary files that are martensitic at body temperature, that means that they don’t straighten once inserted inside the canal.
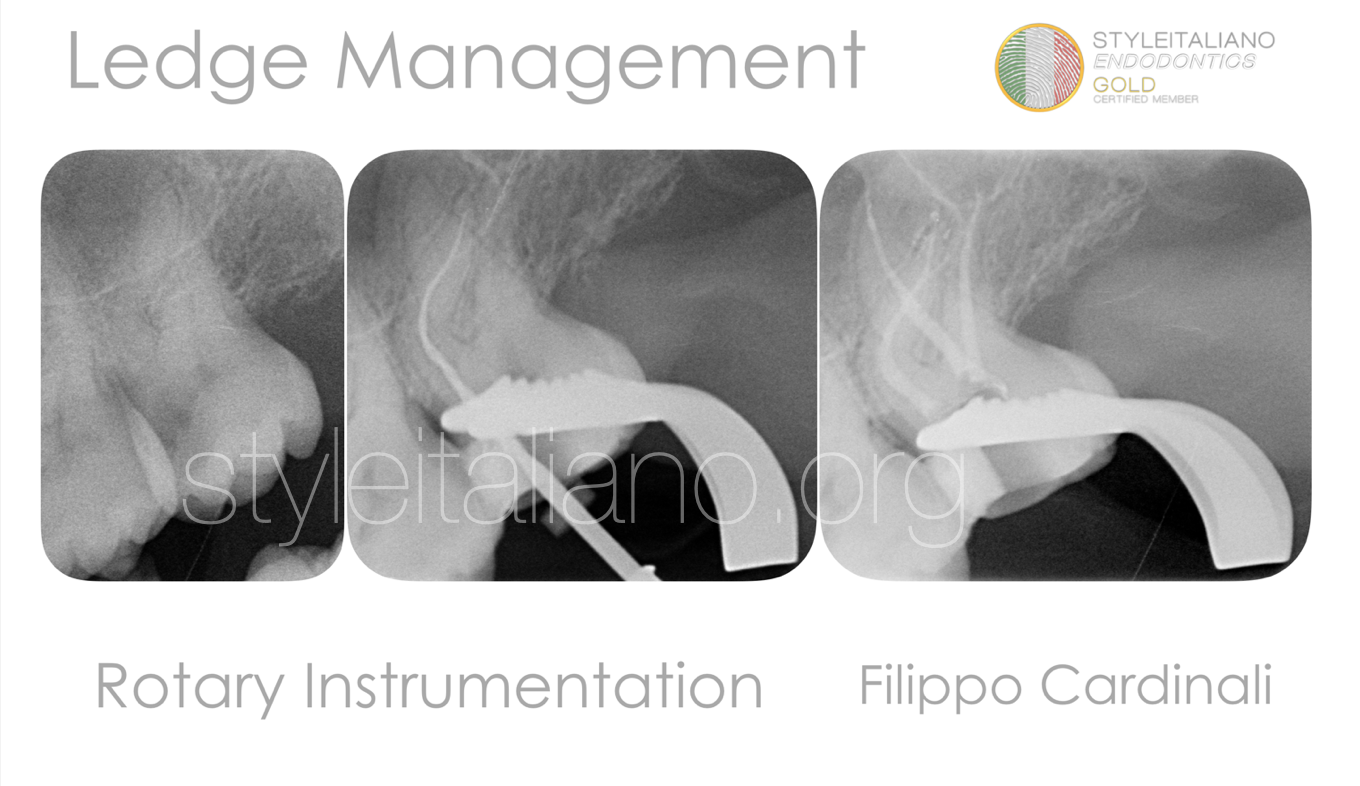
Fig. 5
Ledge on MB root of a maxillary 2nd molar.
Case referred for a blockage on the MB root: because of its curvature a ledge was created on the external wall of the canal. The ledge was managed with the technique explained in the plastic block, The ledge was initially managed with a small prebent manual K-file and the WL restored using an apex locator (E-Pex - Eighteeth) the intra-operative radiograph with the rotary file at WL (One Curve - Coltene MicroMega) shows the degree of the curvature of the MB root.
The obturation was carried out with bioceramic sealer (CeraSeal - Metabiomed) and gutta-percha: in the post-operative radiograph it is visible the deviation from the the original path created by the ledge.
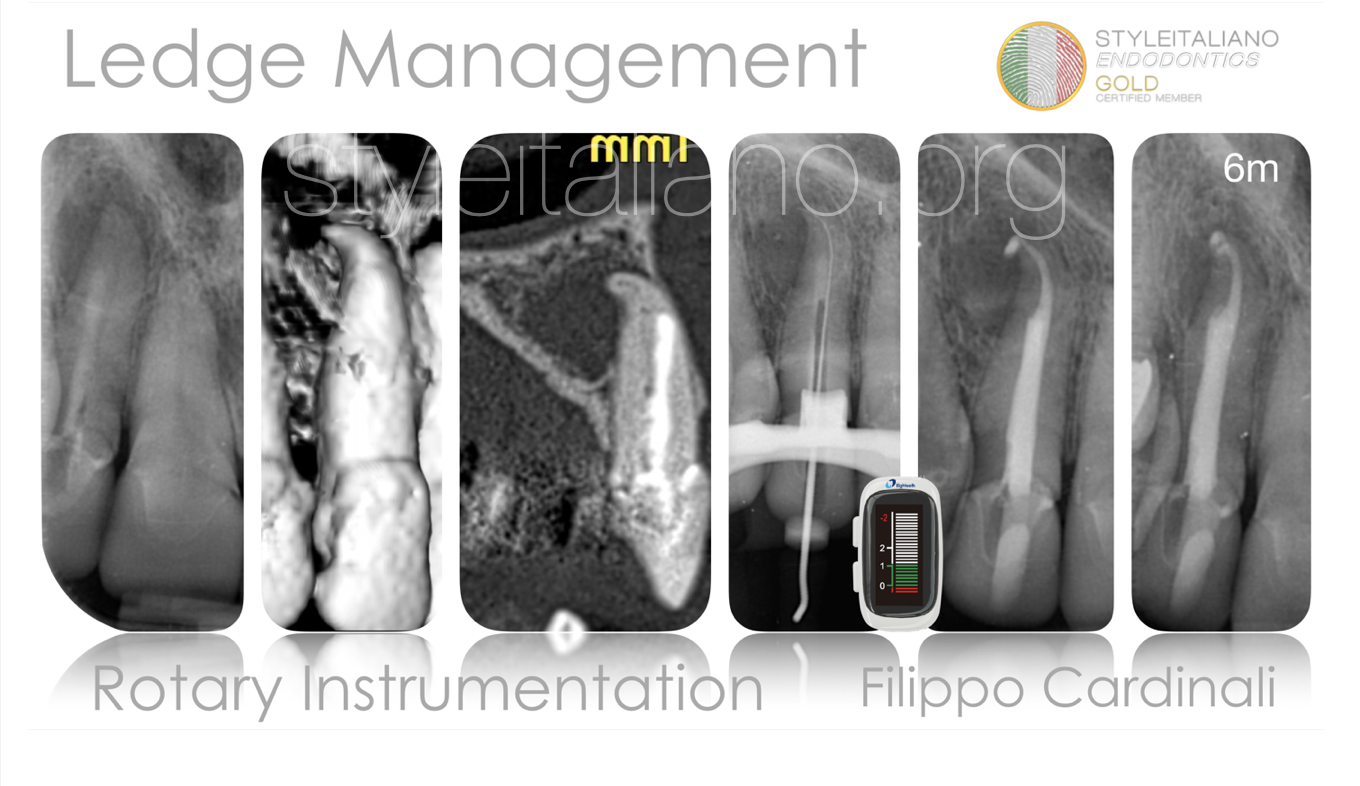
Fig. 6
Retreatment and ledge management on lateral maxillary incisor with periodical lesion.
In lateral maxillary incisor a sharp curvature in palatal direction is often present: if this curvature is not well managed, the probability to create a ledge is really high as in this case. The creation of the ledge impeded the execution of a proper treatment and the therapy failed.
Once registered the WL (Air Pex - Eighteeth), it has been easy to complete the shaping using this technique with a 25.06 taper rotary file martensitic at body temperature (One Curve - Coltene MicroMega).
After a deep Cleaning the canal was obturated using a cold technique with bioceramic sealer (CeraSeal - Metabiomed).
The follow-up at 6 month shows the healing in progress.

Fig. 7
Ledge and perforation management in a maxillary first molar.
Patient was referred because of some problems occurred during the previous treatment: in the preoperative radiograph the presence of a broken file in the disco-buccal root is evident; at the CBCT scan the presence of a ledge that resulted in a perforation in the mesio-buccal root is evident .
Operative Microscope was really useful on the location of the original canal in such a deep portion of the canal, and thanks to the proper use of a reliable apex locator (Air Pex - Eighteeth) it was possible to register the depth of the perforation.
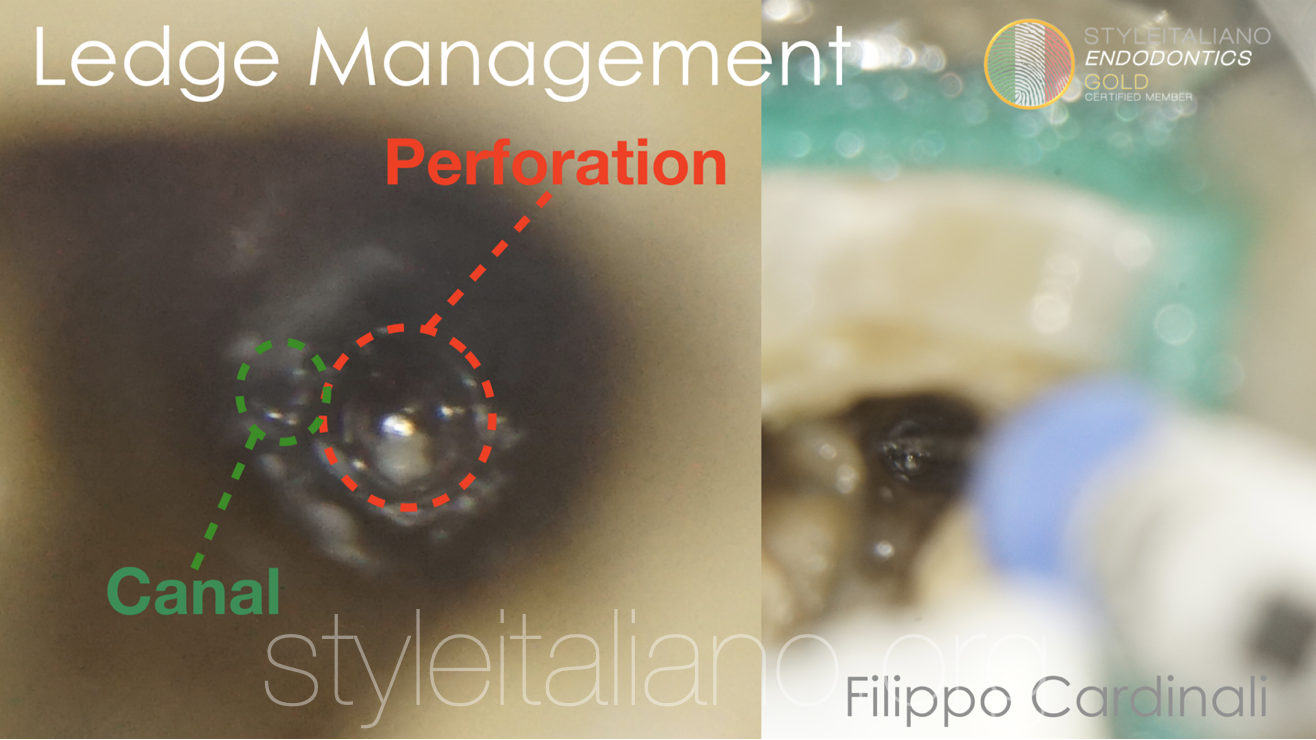
Fig. 8
Ledge and perforation management in a maxillary first molar.
Prebent k-files #8-10-15 were brought gently to the WL with a “watch winding” movement. Once the file #15 arrived at the WL, thanks to the knowledge of the depth of the ledge it was possibile to asses that the tip of the martensitic at body temperature rotary file 25.06 (One Curve - Coltene MicroMega) could enter in the canal apically to the ledge.
Then the rotary file was prebent and inserted using the same technique used for manual files. It’s quite challenging to insert the prebent rotary file mounted on handpiece, especially when it comes to posterior teeth. It’s better to insert manually the rotary file and only after to connect the handpiece to the handle of the rotary file, in order to quickly and safely complete the shaping
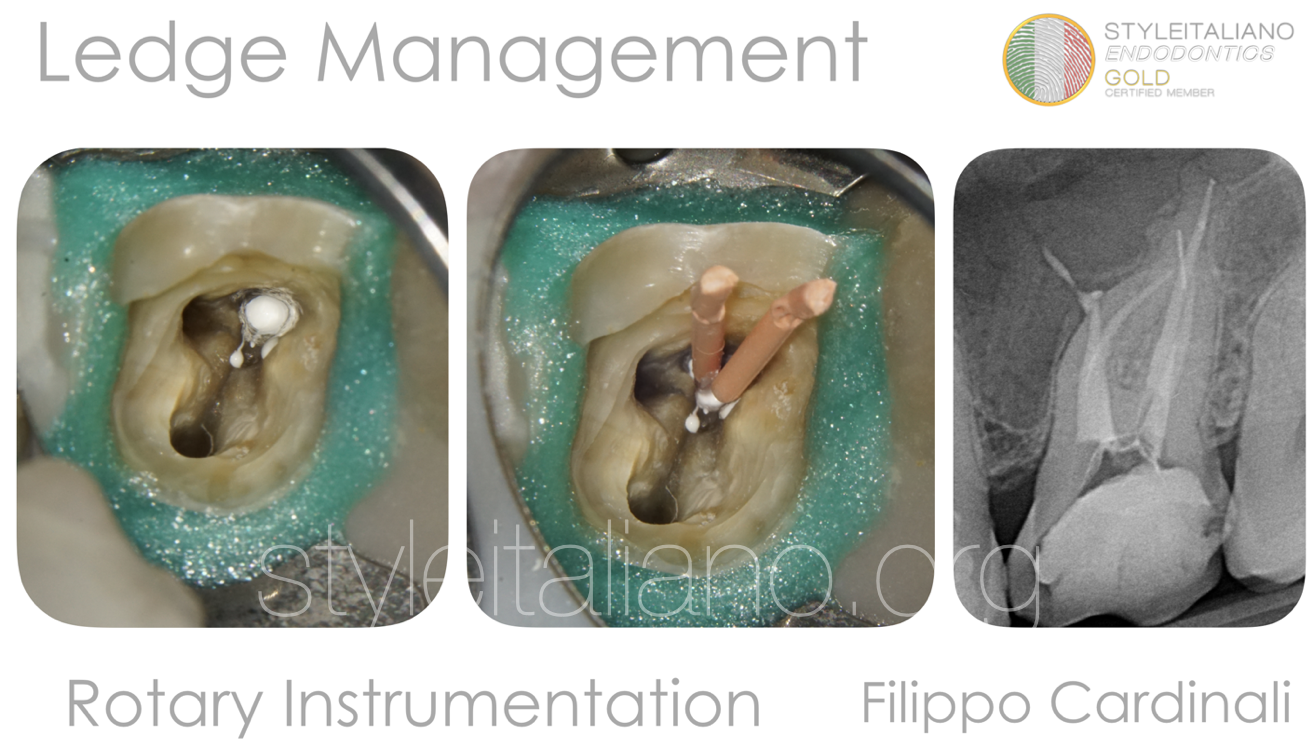
Fig. 9
The broken file was not visible under the microscope and was not possible the bypass or the removal.
So I preferred to rely on a deep cleaning and on the flowability of the bioceramic sealer for the obturation. Even the MB canal and the perforation were obdurated with a cold single cone and bio ceramic sealer (CeraSeal - Metabiomed).
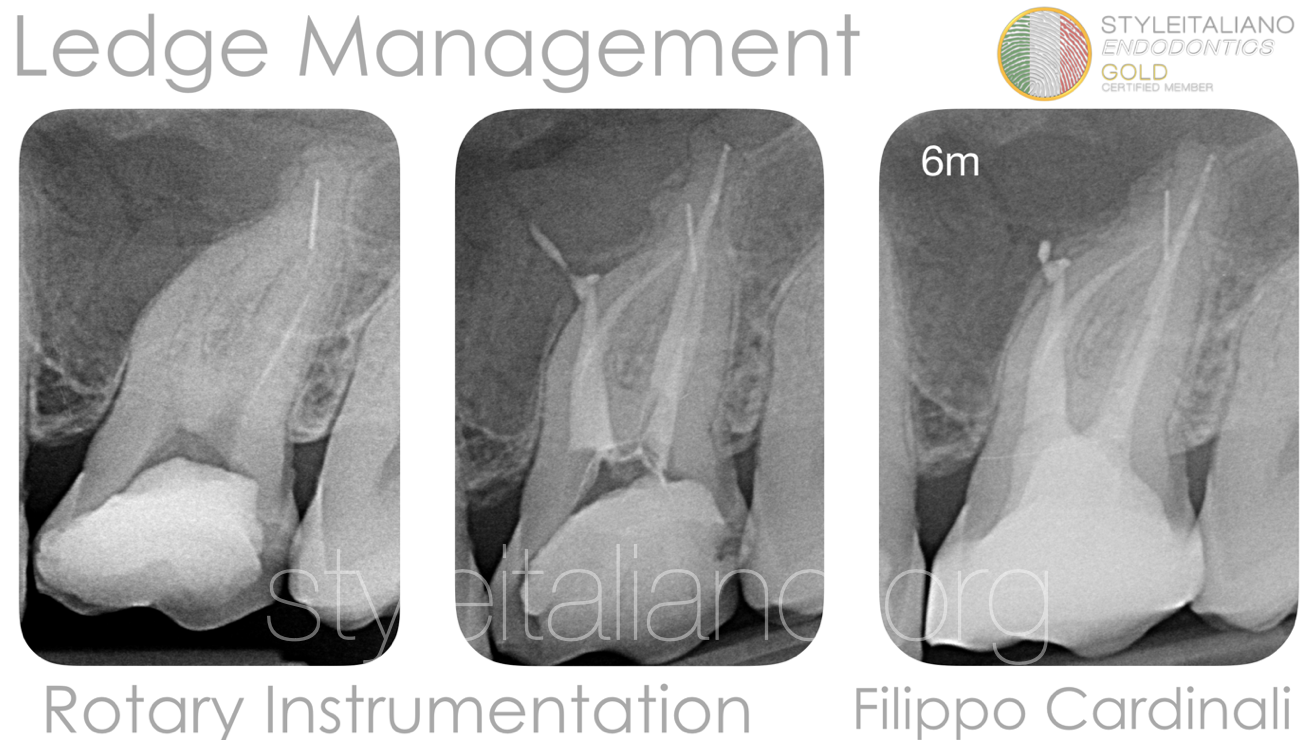
Fig. 10
Follow-up at 6 months.
Conclusions
Ledge management in the past was really challenging and operator-dependant using a manual instrumentation: the shaping was really time consuming, invasive and with a high probability to create internal/external transportation.
Nowadays the new technologies are really helpful and make even the ledge management manageable with a feasible, teachable and repeatable approach.
Once registered the working length, a martensitic at body temperature rotary file can complete safely and quickly the shaping, respecting the original anatomy of the canal apically to the ledge.
Bibliography
1 PetersOA.Currentchallengesandconceptsinthepreparationofrootcanalsystems: a review. J Endod 2004;30:559–67
2 Hulsmann M, Peters OA, Dummer PMH. Mechanical preparation of root canals: shaping goals, techniques and means. Endod Top 2005;10:30–76.
3 Jafarzadeh H, Abbott PV. Ledge formation: review of a great challenge in endodon- tics. J Endod 2007;33:1155–62.
4 Green KJ, Krell KV. Cilinical factors associated with ledged canals in maxillary and mandibular molars.Oral Surg Oral Med Oral Pathol 1990; 70: 490-7.
5 Kaplas A, LambrianidisT. Factor Associated with root canal ledging during instrumentation. Endodo Dent Traumatol 2000; 16: 229-31.